提交工单
咨询集成、功能及报价等问题
Before integrating the ZEGO Express SDK, make sure the development environment meets the following requirements:
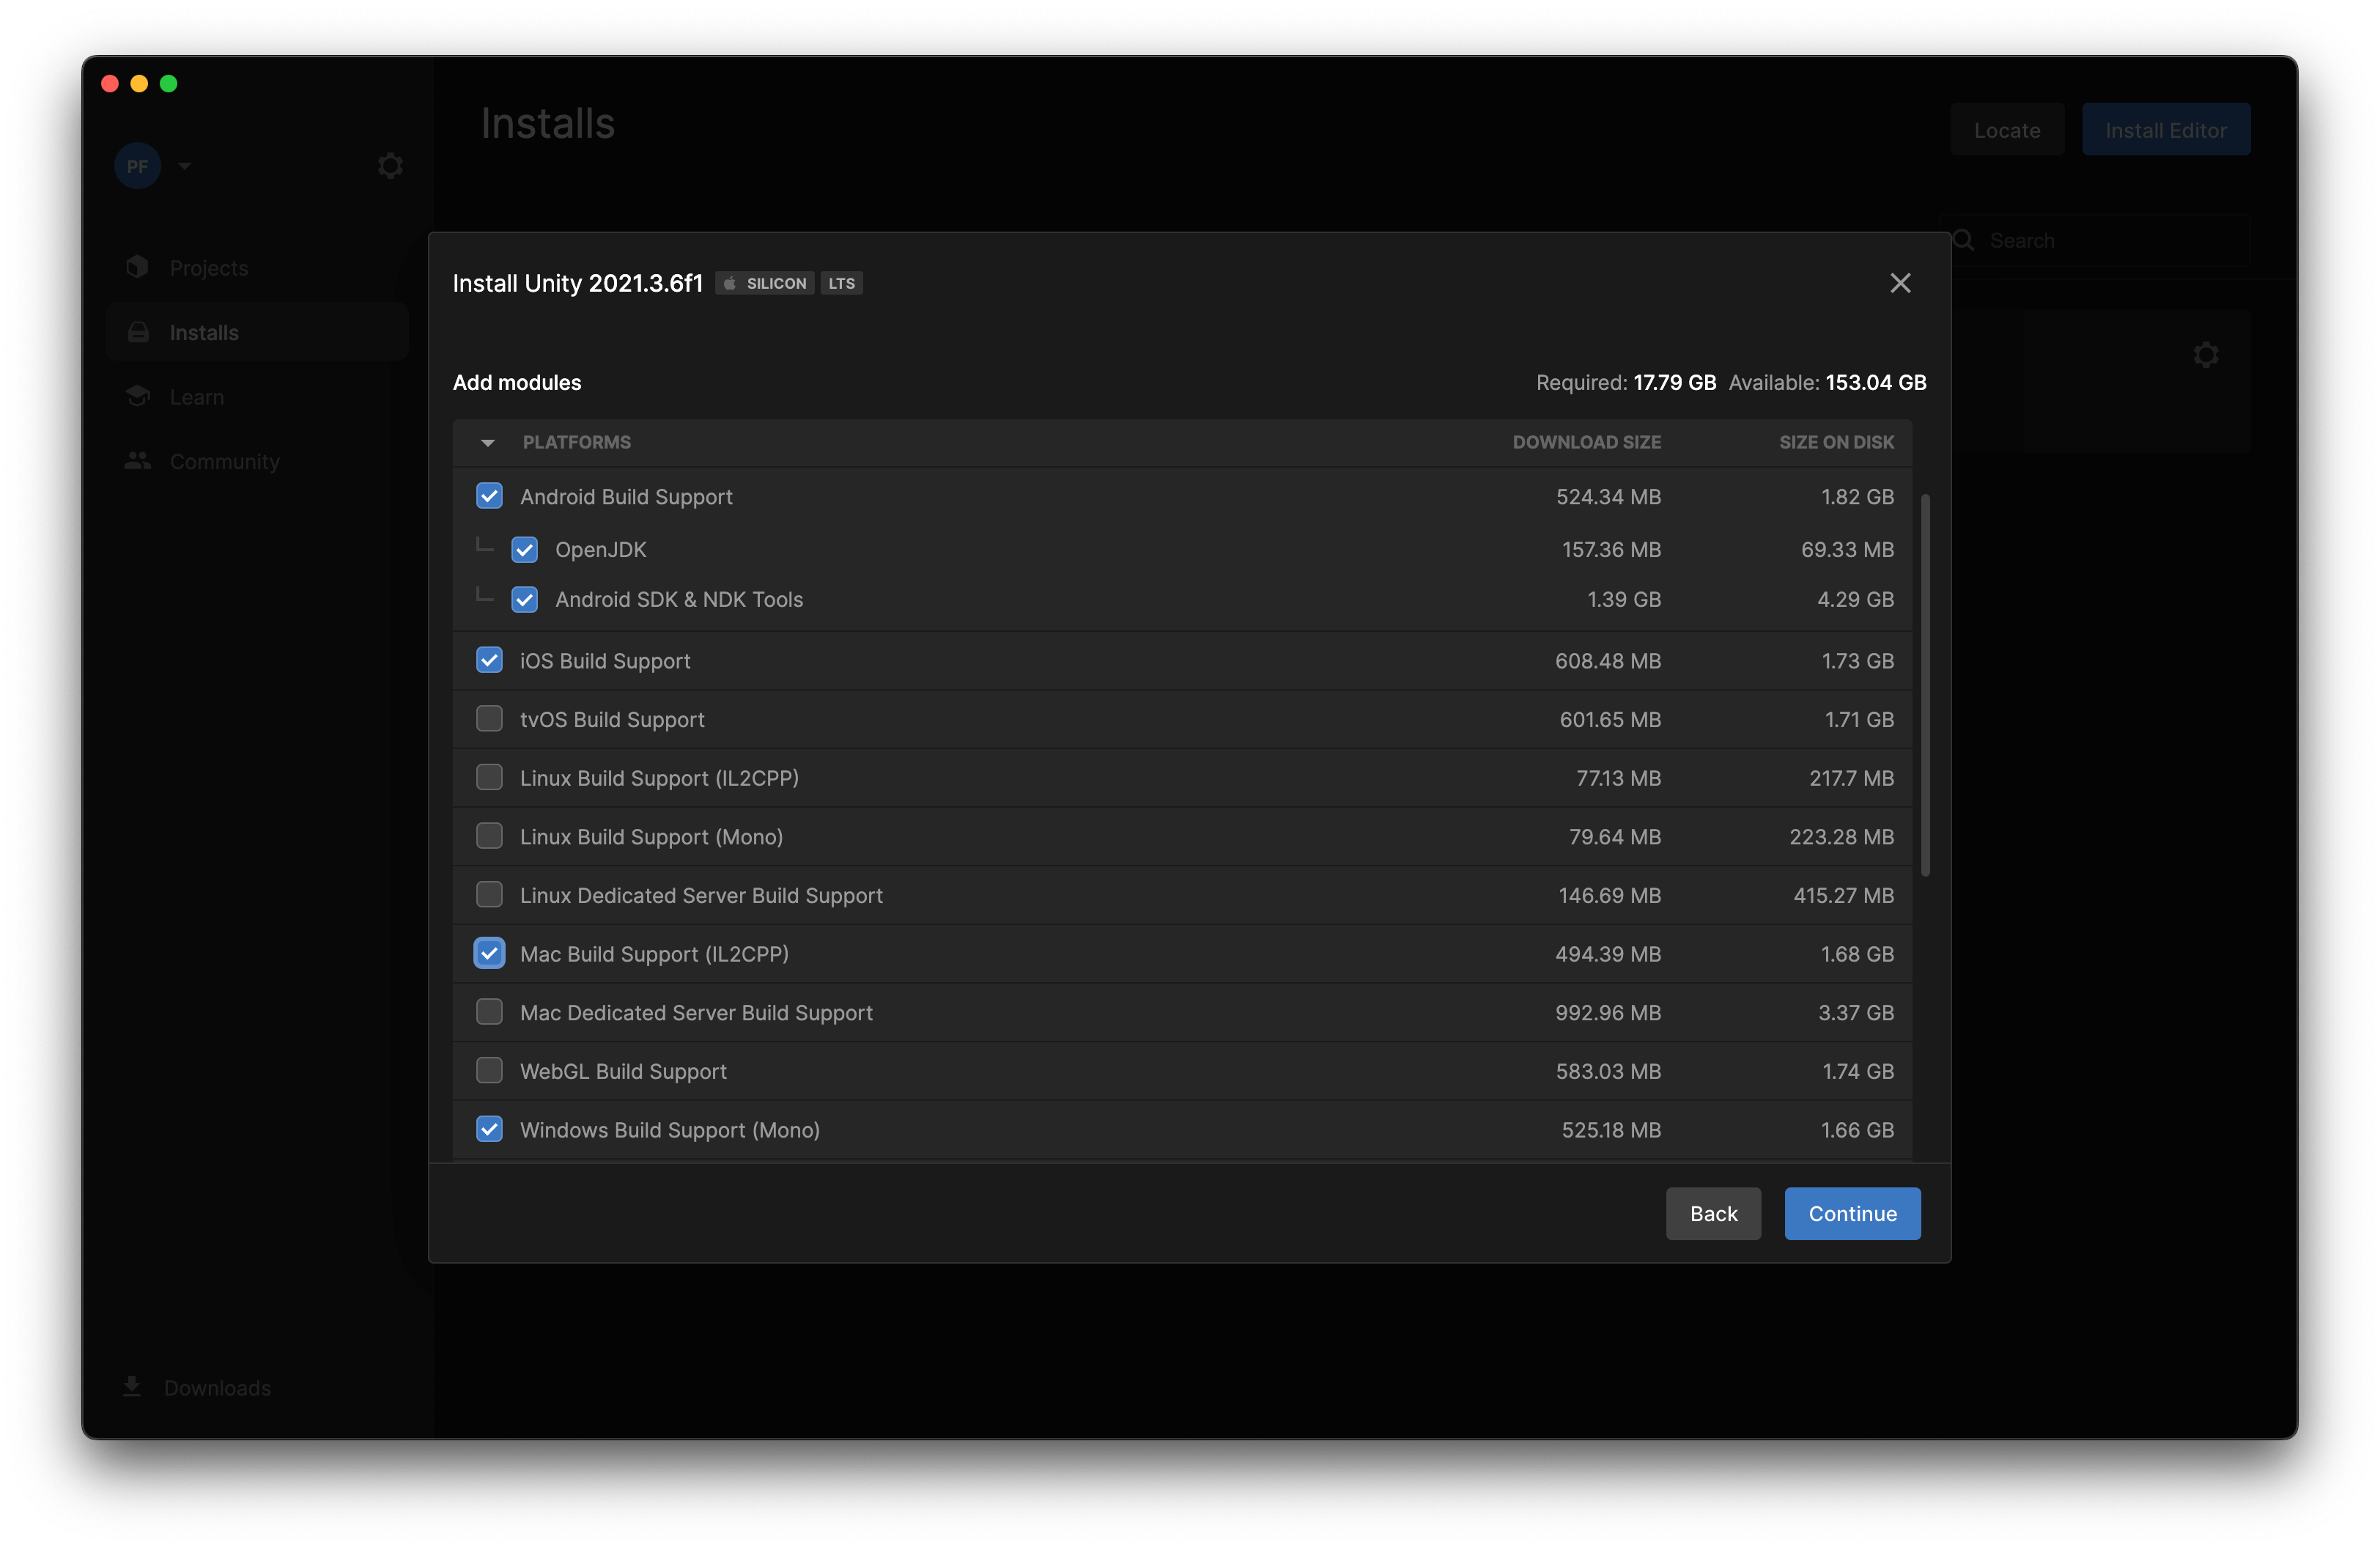
Unity 2018.4.21f1 or above (recommended to download the latest LTS version through Unity Hub). When installing Unity, please select the corresponding "Plaforms" module to download together according to the platform you need to run.
)
Platform-specific requirements:
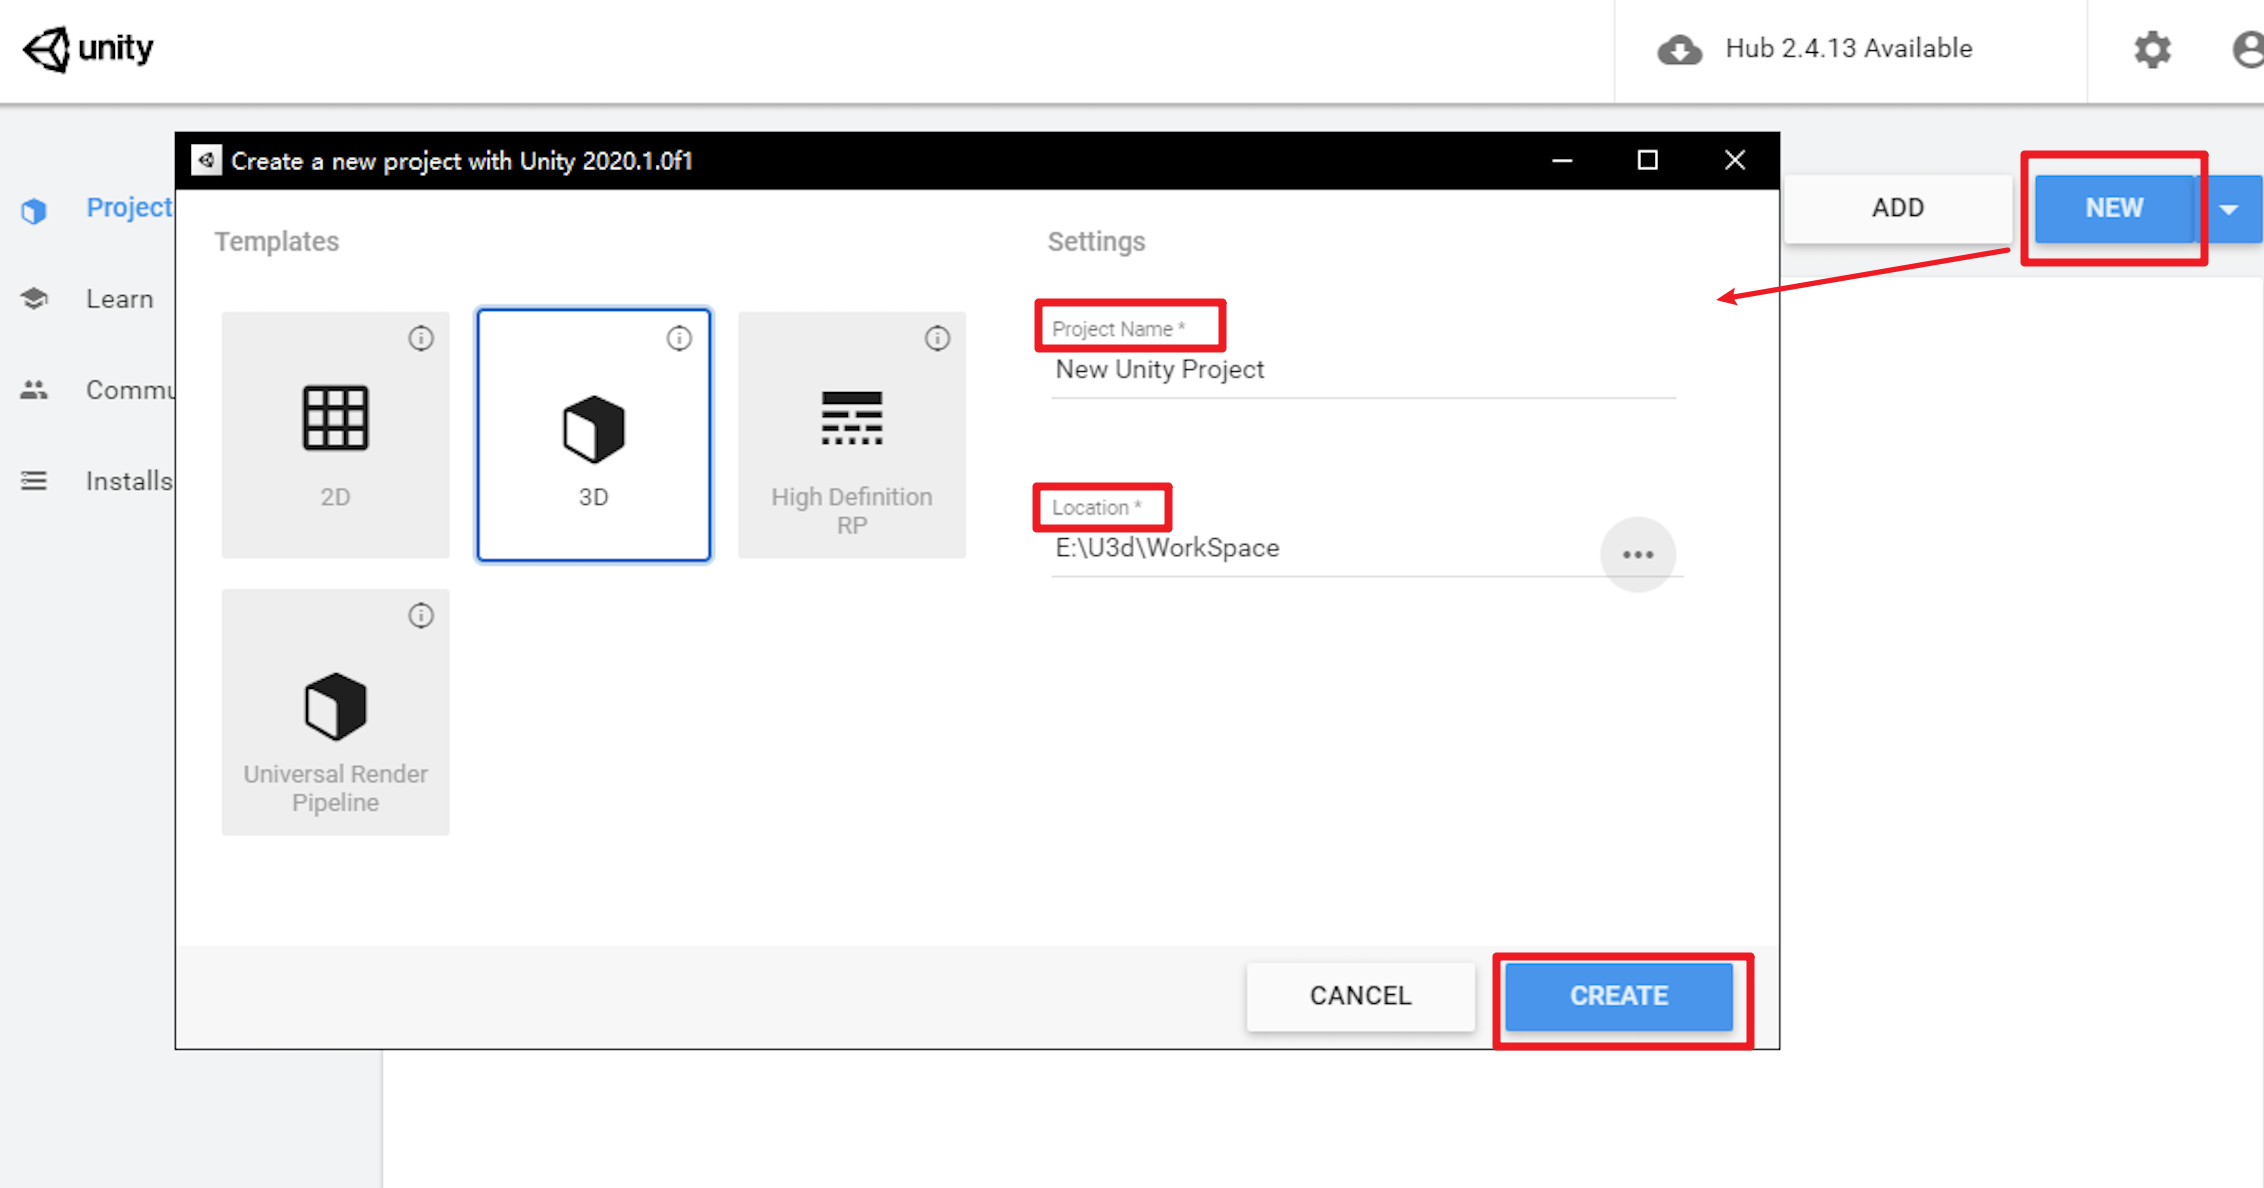
Skip this step if a project already exists.
Click the "New" button, select the "3D" template, fill in the "Project Name", select the "Location" to store the project, and click the "Create" button to create the project.
)
Currently, Unity supports different platforms such as Android, iOS, macOS, and Windows.
Download the latest SDK and extract files from the downloaded SDK package. For more details, see SDK downloads.
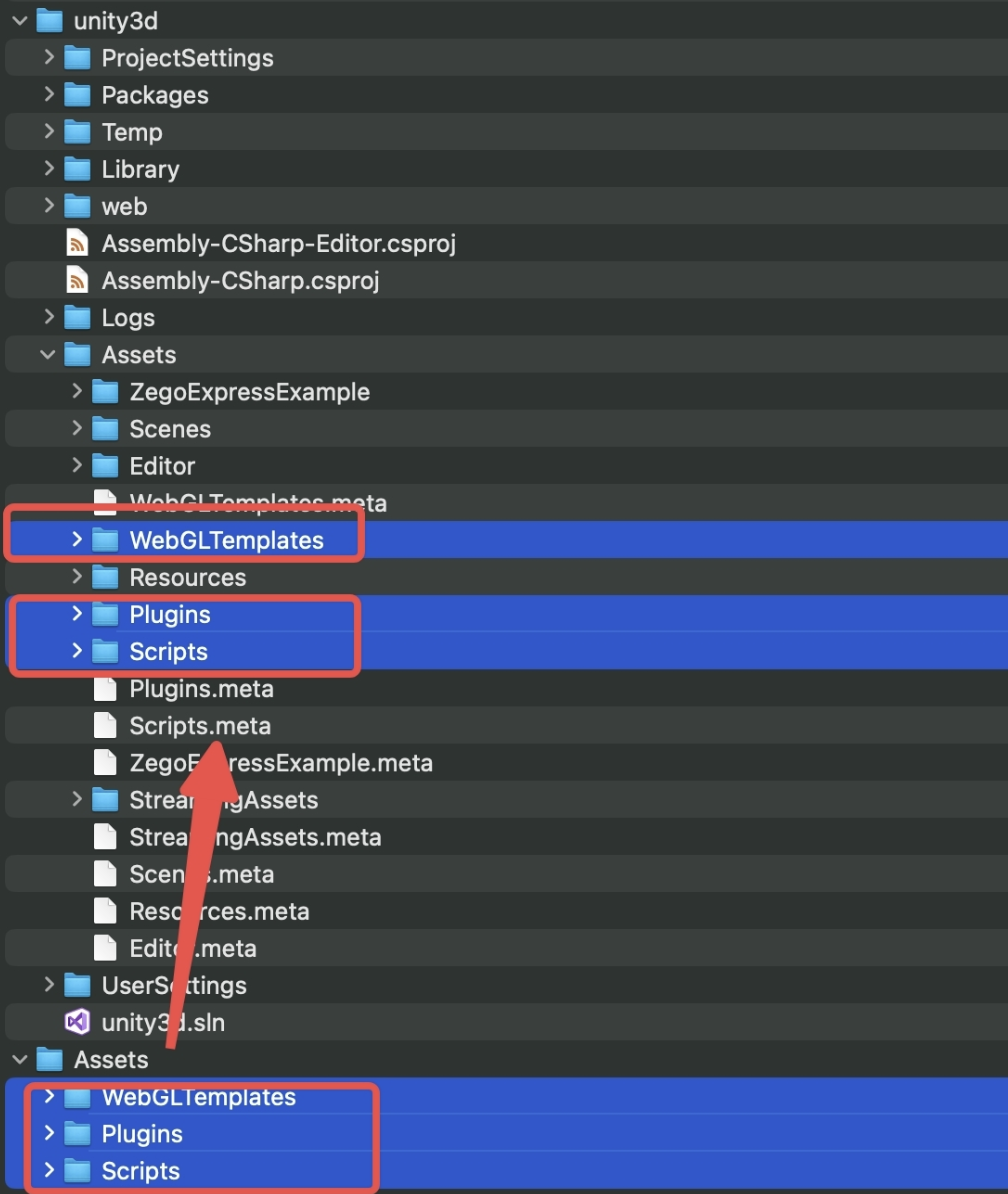
Copy the Plugins and Scripts folders in the downloaded package to the Assets directory of your project.If you need to support the WebGL platform, you also need to copy "WebGLTemplates" to the "Assets" directory of the developer project.
)
For different operating platforms, some additional processing is required.
Windows
)
A ".dll" file with the same name cannot exist in a Unity project, otherwise a "Multiple plugins with the same name 'zegoexpressengine'" error will occurred during Build. Developers need to delete the "x64" folder or "x86" folder under the "Plugins/Windows" folder according to the actual business situation. If you do not plan to run your app on Windows platform, you can delete the "Plugins/Windows" folder directly.
)
)
macOS
The version of Unity before v2019.3 does not support macOS "dylib" as Plugins, you need to manually rename "libZegoExpressEngine.dylib" to "ZegoExpressEngine.bundle" to import the SDK correctly, and the macOS version cannot be lower than 10.5
)
iOS
After exporting the Xcode project, the following errors may be occurred when running directly:
)
There are three folders in XCFramework for iOS platform:
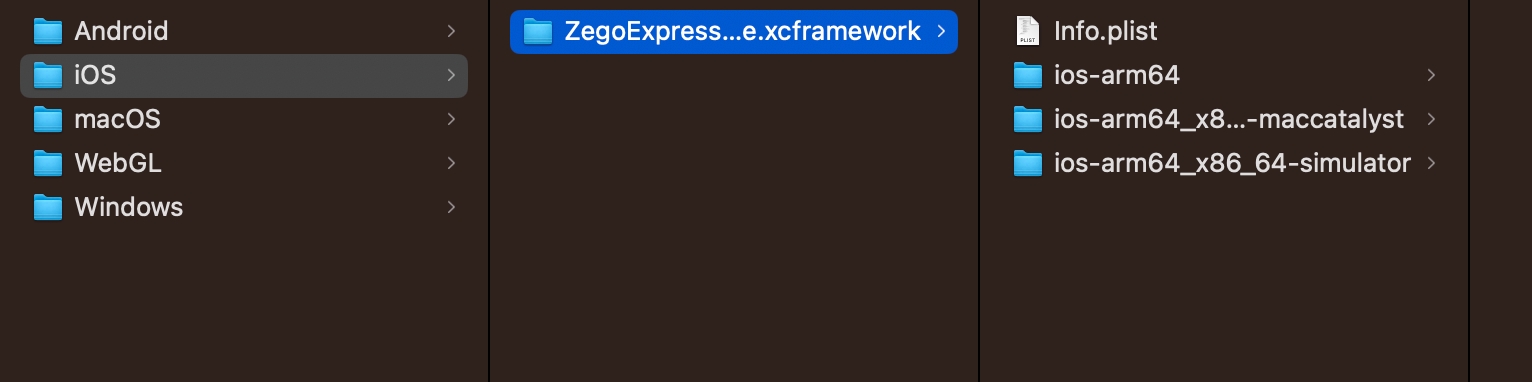)
"ios-arm64_armv7" is the real device architecture, which is used for real device running, debugging and release. Keep this folder and delete the other two when you need to run on a real device.
"ios-arm64_×86_64-simulator" is the simulator architecture, which is used for simulator running and debugging. Keep this folder and delete the other two if you need to run the iOS simulator. (that is, when the project configuration iOS Target SDK is specified as "Simulator SDK")
"ios-arm64_×86_64-maccatalyst" is the iOS MacCatalyst architecture, currently Unity does not support this architecture, please delete it directly. Reference https://forum.unity.com/threads/mac-catalyst.1183951/
Android
)
Building an Android App may also prompt problems with multiple Windows dll files. Follow the Windows approach above.
Follow these procedures to set the camera and microphone permissions for different platforms.
Unity does not obtain the camera and microphone permissions automatically in UNITY_2018_3_OR_NEWER or later versions. You can use the following code for obtaining the permissions:
#if(UNITY_2018_3_OR_NEWER)
using UnityEngine.Android;
#endif
void Start()
{
#if (UNITY_2018_3_OR_NEWER)
    permissionList.Add(Permission.Microphone);
    permissionList.Add(Permission.Camera);
#endif
}
void Update()
{
#if (UNITY_2018_3_OR_NEWER)
    // Obtain device permission
    CheckPermission();
#endif
}
private void CheckPermission()
{
#if (UNITY_2018_3_OR_NEWER)
    foreach (string permission in permissionList)
    {
        if (Permission.HasUserAuthorizedPermission(permission))
        {
        }
        else
        {
            Permission.RequestUserPermission(permission);
        }
    }
#endif
}If you need to deploy your project on iOS, after exporting the Xcode project, select the "Info.plist" file, and add camera and microphone.
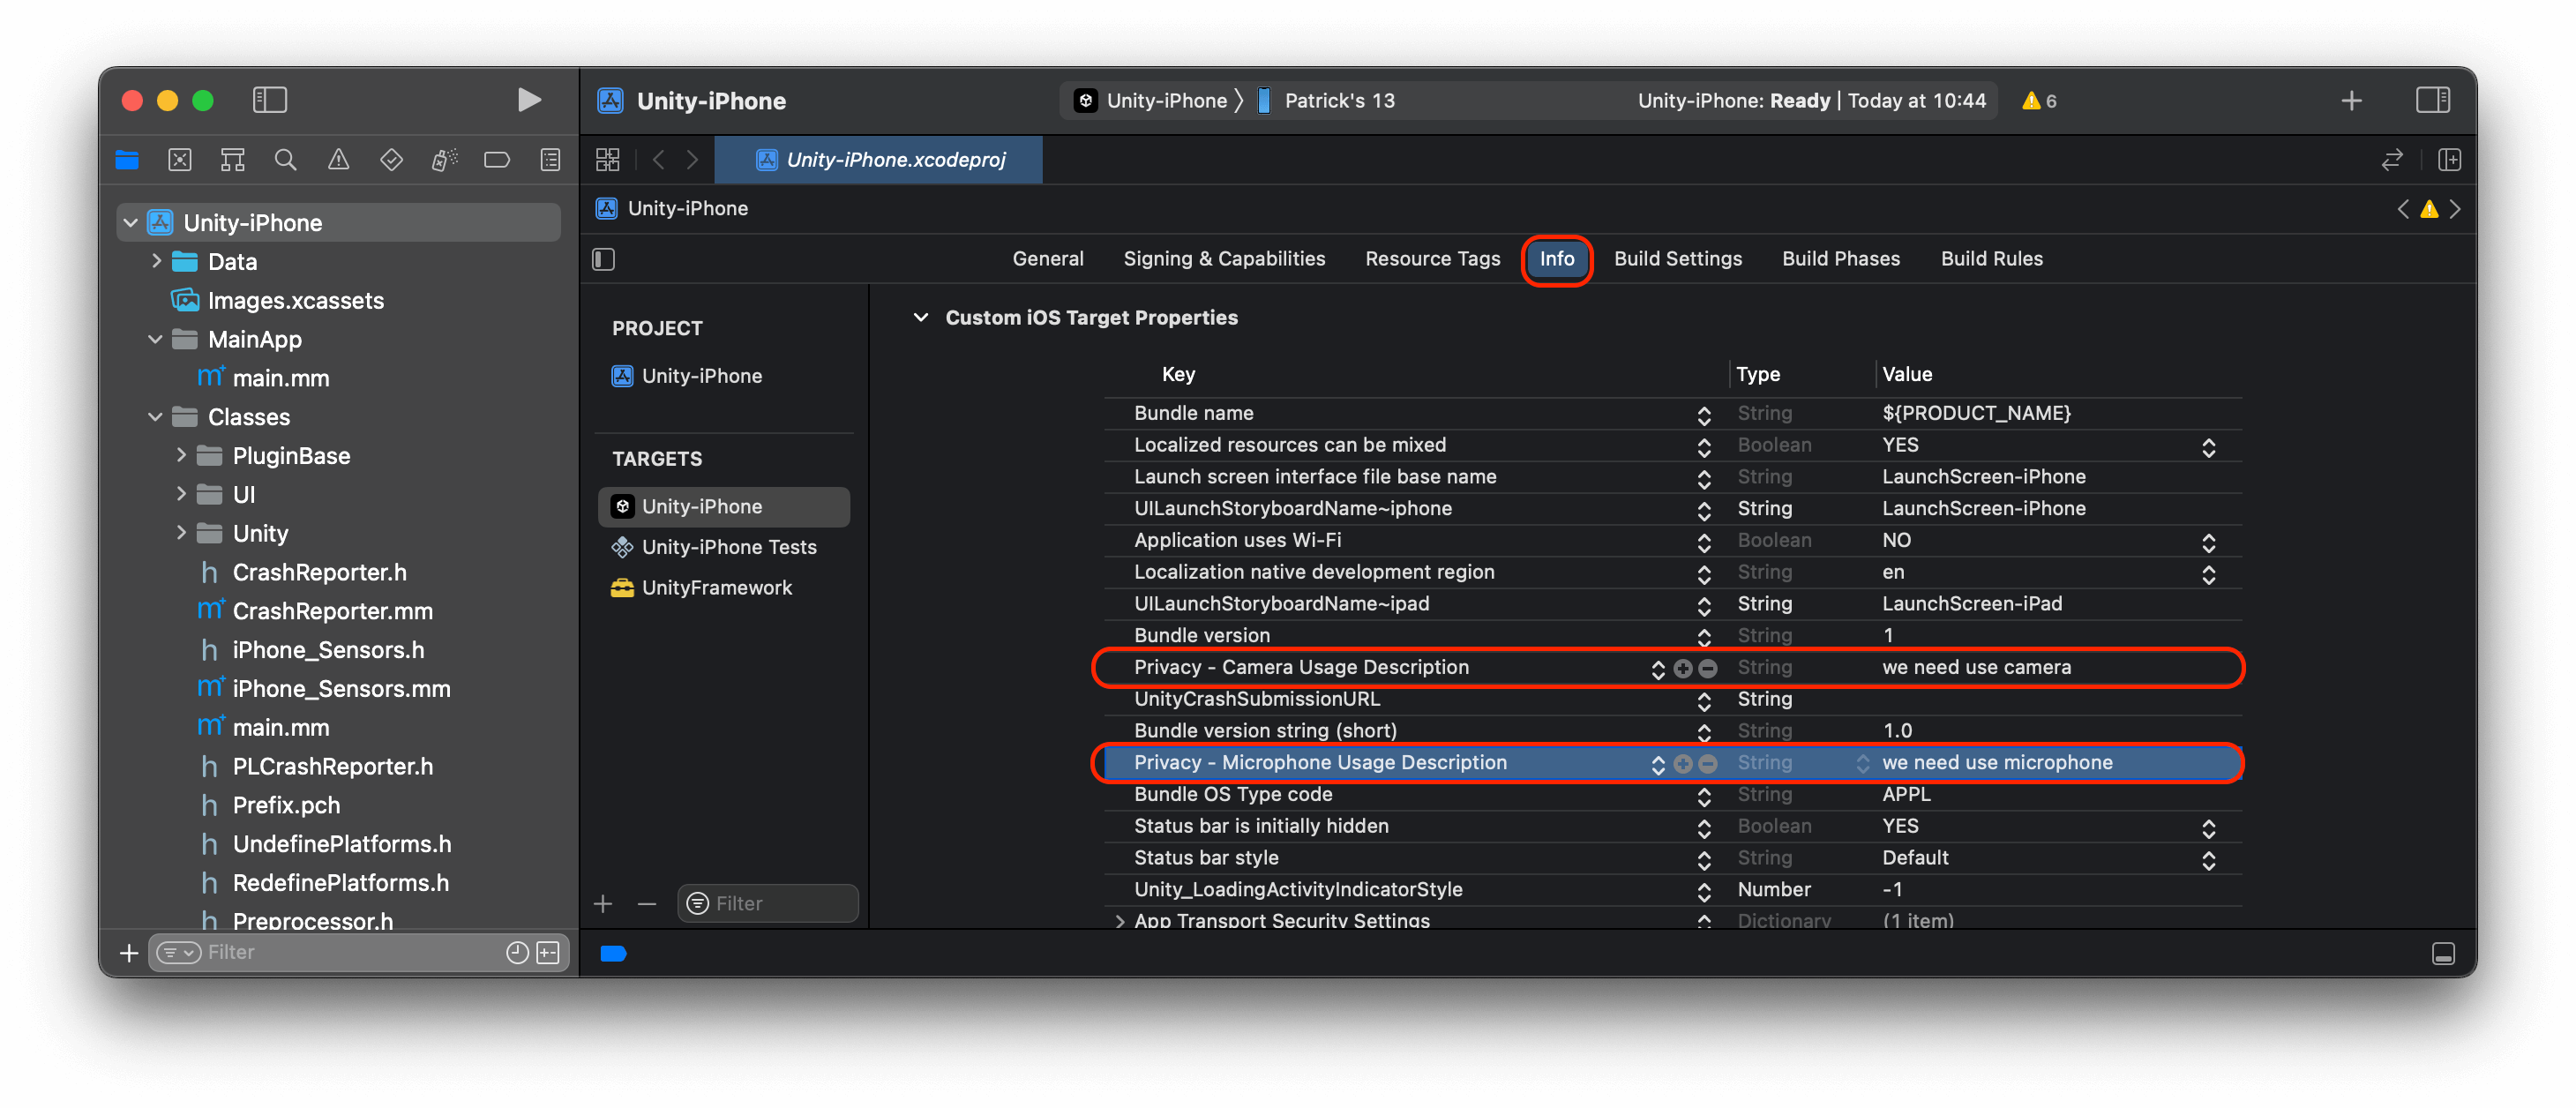)
There are four screen orientations for Android devices and iOS devices: Portrait, PortraitUpsideDown, LandscapeLeft, and LandscapeRight.
To make sure the local preview and remote playback are always displayed in the right orientation, we recommend you add the following code in the update method. Based on the autual situation, you can change the value passed to the angle parameter of the SetAppOrientation method.
private DeviceOrientation preOrientation=DeviceOrientation.Unknown;
void Update()
{
    #if UNITY_ANDROID||  UNITY_IPHONE
        if (engine != null)
        {
            if (preOrientation != Input.deviceOrientation)
            {

                if (Input.deviceOrientation == DeviceOrientation.Portrait)
                {
                    engine.SetAppOrientation(ZegoOrientation.ZegoOrientation_0);
                }
                else if (Input.deviceOrientation == DeviceOrientation.PortraitUpsideDown)
                {
                    engine.SetAppOrientation(ZegoOrientation.ZegoOrientation_180);
                }
                else if (Input.deviceOrientation == DeviceOrientation.LandscapeLeft)
                {
                    engine.SetAppOrientation(ZegoOrientation.ZegoOrientation_90);
                }
                else if (Input.deviceOrientation == DeviceOrientation.LandscapeRight)
                {
                    engine.SetAppOrientation(ZegoOrientation.ZegoOrientation_270);
                }
                preOrientation = Input.deviceOrientation;

            }
        }
    #endif
}To prevent this issue, you must add the following code:
void OnApplicationQuit()
{
    //It must be added for unity editor debugging; otherwise, Unity may get stuck.
    ZegoExpressEngine.DestroyEngine();
}
Is it necessary to integrate ZegoExpressEngine.framework after exporting the iOS Xcode project?
The answer is Yes. You need to add "ZegoExpressEngine.framework" in the "TARGETS > Build Phases > Embed Frameworks":
)
If you don't do this, the following error will occur when you run the project on your device:
no suitable image found.  Did find:
/private/var/containers/Bundle/Application/3CC0EE65-89C9-45F5-8E22-A4AC194DF260/hello.app/Frameworks/UnityFramework.framework/Frameworks/ZegoExpressEngine.framework/ZegoExpressEngine: code signature in (/private/var/containers/Bundle/Application/3CC0EE65-89C9-45F5-8E22-A4AC194DF260/hello.app/Frameworks/UnityFramework.framework/Frameworks/ZegoExpressEngine.framework/ZegoExpressEngine) not valid for use in process using Library Validation: mapped file has no cdhash, completely unsigned? Code has to be at least ad-hoc signed.
Developers can also refer to the following "ZEGO_BuildPostProcess.cs" file. After adjusting the code according to the actual situation, place the file in the Editor directory under the Assets directory of Unity. During the process of exporting the Xcode project, Unity will automatically complete the integration of ZegoExpressEngine.framework, without the need for Manually add it to achieve automatic configuration integration ZegoExpressEngine.framework.
using UnityEngine;
using UnityEditor;
using UnityEditor.Callbacks;
using System.Collections;
using UnityEditor.iOS.Xcode;
using System.IO;
using UnityEditor.iOS.Xcode.Extensions;

public class ZEGO_BuildPostProcess
{

[PostProcessBuild]
public static void OnPostprocessBuild(BuildTarget buildTarget, string path) {

 if (buildTarget == BuildTarget.iOS) {
  // string projPath = path + "/Unity-iPhone.xcodeproj/project.pbxproj";
  // DisableBitcode(projPath);
  LinkLibraries (path);
 }
}

public static void DisableBitcode (string projPath) {
 PBXProject proj = new PBXProject();
 proj.ReadFromString(File.ReadAllText(projPath));
 string target = proj.TargetGuidByName("Unity-iPhone");
 proj.SetBuildProperty(target, "ENABLE_BITCODE", "false");
 File.WriteAllText(projPath, proj.WriteToString());
}

public static void LinkLibraries (string path) {
 // linked library
 string projPath = path + "/Unity-iPhone.xcodeproj/project.pbxproj";
 PBXProject proj = new PBXProject();
 proj.ReadFromFile(projPath);
 string target;

 var unityMainTargetGuidMethod = proj.GetType().GetMethod("GetUnityMainTargetGuid");

 if (unityMainTargetGuidMethod != null)
 {
  target = (string)unityMainTargetGuidMethod.Invoke(proj, null);
 }
 else
 {
  target = proj.TargetGuidByName("Unity-iPhone");
 }
 proj.SetBuildProperty(target, "ENABLE_BITCODE", "false");
       const string defaultLocationInProj = path + "/Libraries/Plugins/iOS/iphoneos"; // The actual path to the ZegoExrpessFramework file.
       const string coreFrameworkName = "ZegoExpressEngine.framework";
       string framework = Path.Combine(defaultLocationInProj, coreFrameworkName);
       string fileGuid = proj.AddFile(framework, "/" + coreFrameworkName, PBXSourceTree.Source);
       PBXProjectExtensions.AddFileToEmbedFrameworks(proj, target, fileGuid);
       File.WriteAllText(projPath, proj.WriteToString());

 // permission
 string pListPath = path + "/Info.plist";
 PlistDocument plist = new PlistDocument();
 plist.ReadFromString(File.ReadAllText(pListPath));
 PlistElementDict rootDic = plist.root;
 var cameraPermission = "NSCameraUsageDescription";
 var micPermission = "NSMicrophoneUsageDescription";
 rootDic.SetString(cameraPermission, "Need to access your camera for video call.");
 rootDic.SetString(micPermission, "Need to access your microphone for voice call.");
 File.WriteAllText(pListPath, plist.WriteToString());
}
}
