提交工单
咨询集成、功能及报价等问题
Kit Token is a credential the ZEGOCLOUD UIKit uses for authentication: to validate the user’s permission. It will also determine:
ZEGOCLOUD UIKits provide the method to generate the Kit Token on the client app, while it's not safe enough for you to make your app go live officially. Here, we recommend you generate the Kit Token on your app server. Check this guide out:
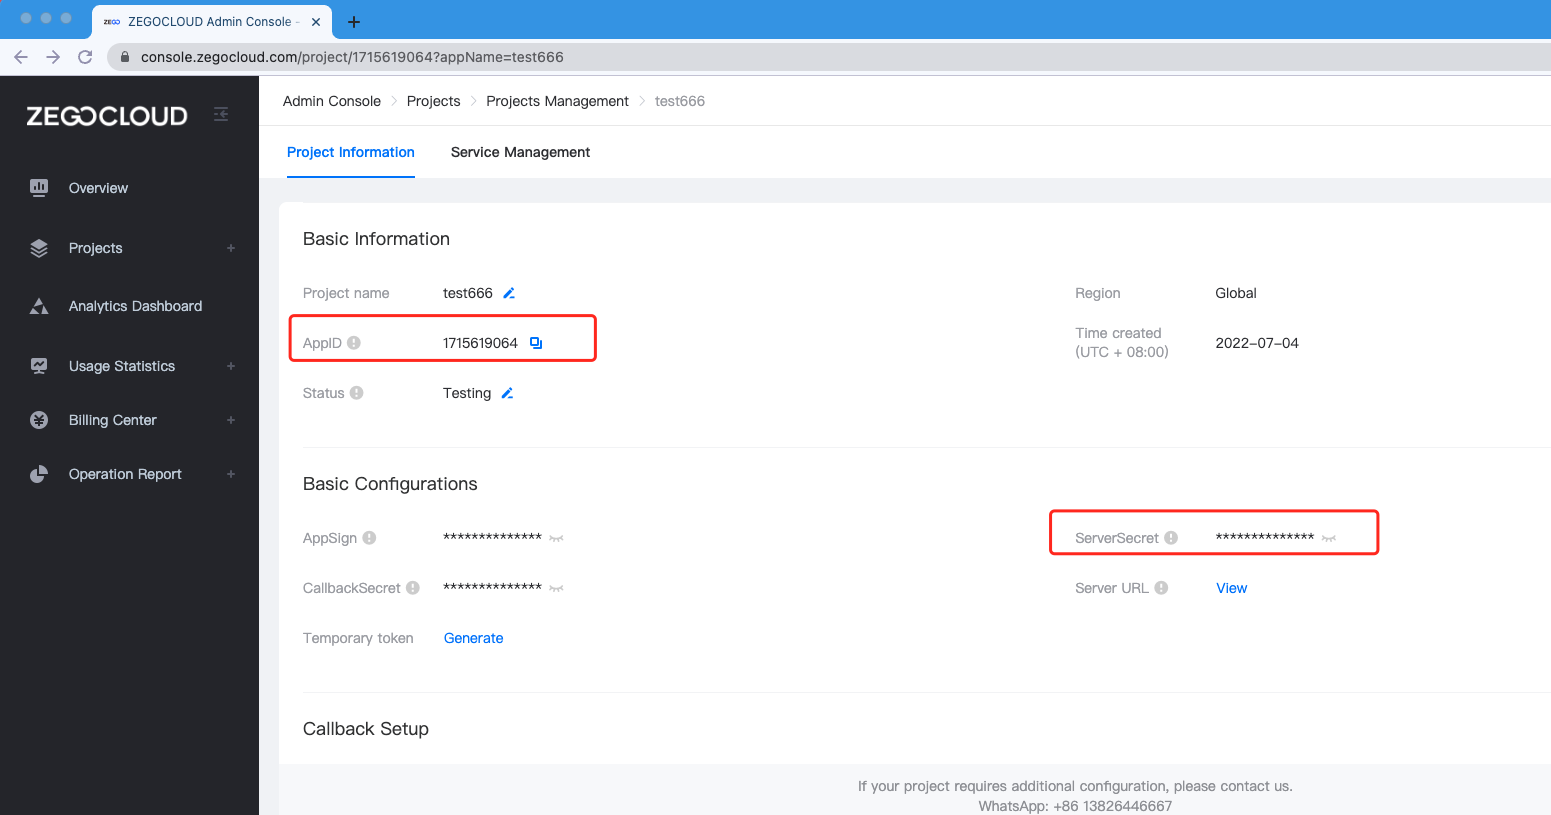)
After getting your AppID and ServerSecret, you can define the validation rules on your app server or client based on your business requirements.
We provide an open-source Token generator plug-in on GitHub, which you can use to generate Tokens using different programming languages such as Go, C++, Java, Python, PHP,.NET, and Node.js.
| Language | ||||
|---|---|---|---|---|
Go |
Go 1.14.15 or later |
GenerateToken04 |
||
C++ |
C++ 11 or later |
GenerateToken04 |
||
Java |
Java 1.8 or later |
generateToken04 |
||
Python |
Python 3.6.8 or later |
generate_token04 |
||
PHP |
PHP 5.6 or later |
generateToken04 |
||
.NET |
.NET Framework 3.5 or later |
GenerateToken04 |
||
Node.js |
Node.js 8 or later |
generateToken04 |
Here we recommend the Composer Autoload, that is the Composer's PSR-4 autoload.
a. Copy the downloaded package to the project's root directory. Let's take the /my_project/zego directory as an example, where /my_project/ is the root directory.
b. Include the psr-4 autoload config to the vim /my_project/composer.json file.
{
  ...
  "autoload": {
    "psr-4": {
      "ZEGO\\": "zego/src/ZEGO"
    }
  }
  ...
}
c. Run the composer dump-autoload, or composer dump-autoload -o(for production environment), or composer update command to generate an autoload file.
/my_project/xxx.php file. payload field empty (because the Token is only used for a simple permission validation for service API).require 'vendor/autoload.php';
use ZEGO\ZegoServerAssistant;
use ZEGO\ZegoErrorCodes;
$appId = 1111;
$userId = 'demo';
$secret = 'You serverSecret';
$payload = '';
$token = ZegoServerAssistant::generateToken04($appId,$userId,$secret,3600,$payload);
if( $token->code == ZegoErrorCodes::success ){
print_r(json_encode($token));
}To generate the Kit Token:
token field in the following code with the Token you just generated in the previous steps//... your own logic code
fetch(
`${youServerUrl}?userID=${userID}&expired_ts=86400`,
{
method: "GET",
}
)
.then((res) => res.json())
.then(({token})=>{
const kitToken = ZegoUIKitPrebuilt.generateKitTokenForProduction(
appID,
token,
roomID,
userID,
userName
);
const zp = ZegoUIKitPrebuilt.create(kitToken);
//... to joinRoom
})