提交工单
咨询集成、功能及报价等问题
This guide describes how to integrate the SDK and implement a basic one-on-one voice call using ZEGOCLOUD's ZegoExpressEngine SDK.
Before you begin, make sure you complete the following:
flutter pub add zego_express_engineimport 'package:zego_express_engine/zego_express_engine.dart';The following diagram shows the basic process of User A playing a stream published by User B:
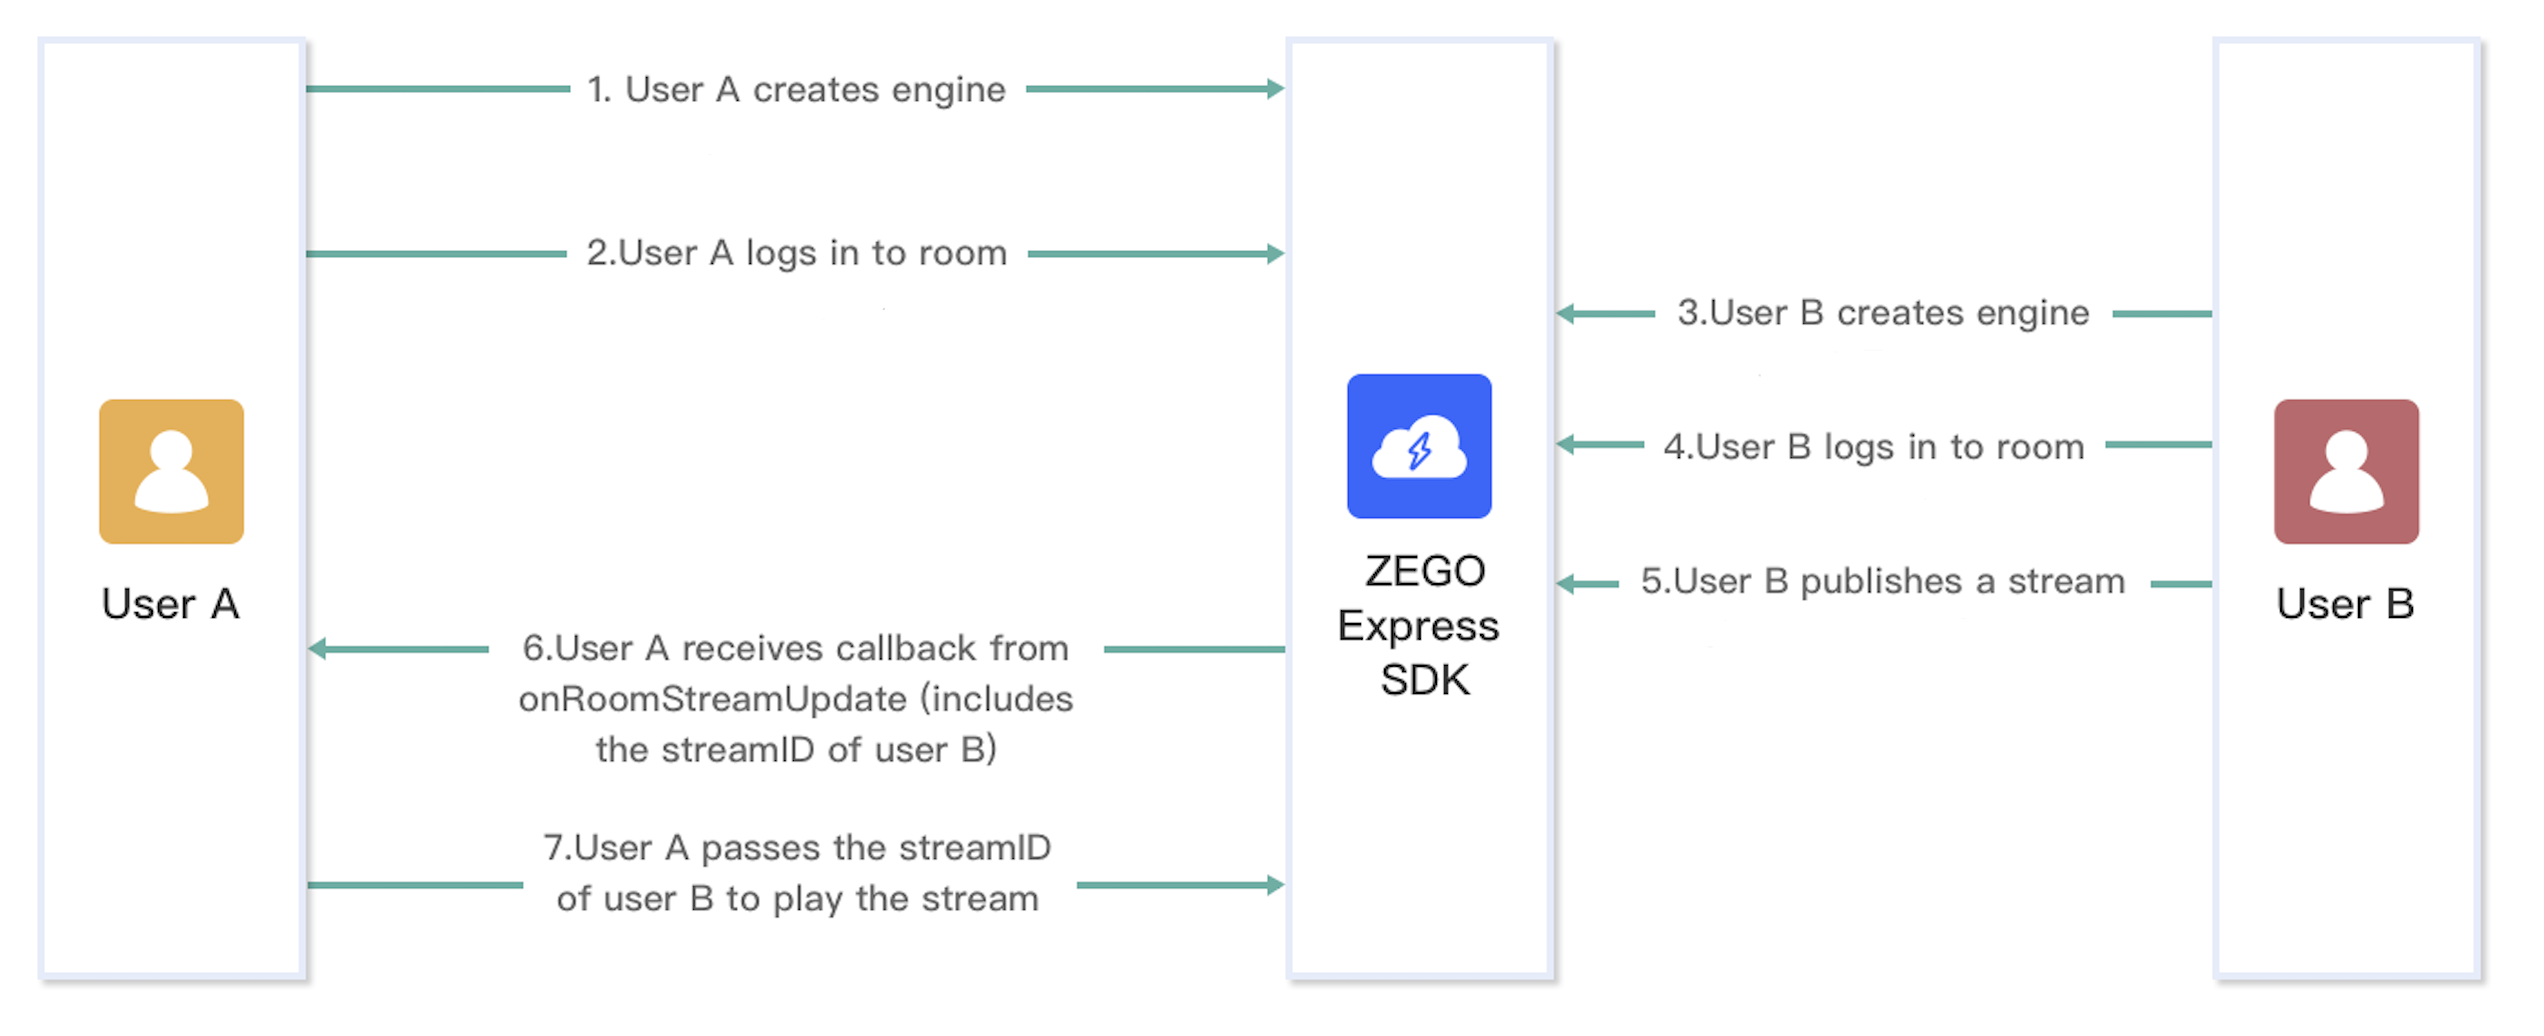)
For a better understanding, you can check the key concepts of ZegoExpressEngine SDK:
Here is a downloadable demo code that can be used as a reference when developing your app.
The above demo is for video calls. To implement voice calls, you need to:
scenario of ZegoEngineProfile to StandardVoiceCall when calling the createEngineWithProfile method.ZegoExpressEngine.instance.enableCamera(false); before starting to publish the stream to switch to Voice Call mode.First, call the createEngineWithProfile method to initialize the ZegoExpressEngine SDK. And config the following:
profile: the ZegoEngineProfile object, used to config the appID and appSign, as well as the scenario you are applying the SDK to. To destroy the SDK and release the resources it occupies, call the destroy method.
Future<void> createEngine() async {
  WidgetsFlutterBinding.ensureInitialized();
  // Get your AppID and AppSign from ZEGOCLOUD Console
  //[My Projects -> AppID] : https://console.zegocloud.com/project
  await ZegoExpressEngine.createEngineWithProfile(ZegoEngineProfile(
    appID,
    ZegoScenario.StandardVoiceCall,
    appSign: kIsWeb ? null : appSign,
  ));
}Implement the ZegoEventHandler event handler to listen for event callbacks, such as the event callback on the updates when the in-room streams are added or deleted, the updates when in-room participants log in or log out, the updates when room connection state changes, and more.
onRoomStreamUpdate: Callback for updates on the status of the streams in the room. When new streams are published to the room or existing streams in the room stop, the SDK sends out the event notification through this callback. You can call startPlayStream() and stopPlayStream() methods in this callback.
onRoomStateUpdate: Callback for updates on current room connection status. When the current room connection status changes (for example, when the current user is disconnected from the room or login authentication fails), the SDK sends out the event notification through this callback.
onRoomUserUpdate: Callback for updates on the status of other users in the room. When other users log in or log out of the room, the SDK sends out the event notification through this callback.
void startListenEvent() {
  // Callback for updates on the status of other users in the room.
  // Users can only receive callbacks when the isUserStatusNotify property of ZegoRoomConfig is set to `true` when logging in to the room (loginRoom).
  ZegoExpressEngine.onRoomUserUpdate = (roomID, updateType, List<ZegoUser> userList) {
    debugPrint(
        'onRoomUserUpdate: roomID: $roomID, updateType: ${updateType.name}, userList: ${userList.map((e) => e.userID)}');
  };
  // Callback for updates on the status of the streams in the room.
  ZegoExpressEngine.onRoomStreamUpdate = (roomID, updateType, List<ZegoStream> streamList, extendedData) {
    debugPrint(
        'onRoomStreamUpdate: roomID: $roomID, updateType: $updateType, streamList: ${streamList.map((e) => e.streamID)}, extendedData: $extendedData');
    if (updateType == ZegoUpdateType.Add) {
      for (final stream in streamList) {
        startPlayStream(stream.streamID);
      }
    } else {
      for (final stream in streamList) {
        stopPlayStream(stream.streamID);
      }
    }
  };
  // Callback for updates on the current user's room connection status.
  ZegoExpressEngine.onRoomStateUpdate = (roomID, state, errorCode, extendedData) {
    debugPrint(
        'onRoomStateUpdate: roomID: $roomID, state: ${state.name}, errorCode: $errorCode, extendedData: $extendedData');
  };

  // Callback for updates on the current user's stream publishing changes.
  ZegoExpressEngine.onPublisherStateUpdate = (streamID, state, errorCode, extendedData) {
    debugPrint(
        'onPublisherStateUpdate: streamID: $streamID, state: ${state.name}, errorCode: $errorCode, extendedData: $extendedData');
  };
}

void stopListenEvent() {
  ZegoExpressEngine.onRoomUserUpdate = null;
  ZegoExpressEngine.onRoomStreamUpdate = null;
  ZegoExpressEngine.onRoomStateUpdate = null;
  ZegoExpressEngine.onPublisherStateUpdate = null;
}To log in to a room, call the loginRoom method.
To log out, you can call the logoutRoom method.
Future<ZegoRoomLoginResult> loginRoom() async {
  // The value of `userID` is generated locally and must be globally unique.
  final user = ZegoUser(widget.localUserID, widget.localUserName);

  // The value of `roomID` is generated locally and must be globally unique.
  final roomID = widget.roomID;

  // onRoomUserUpdate callback can be received when "isUserStatusNotify" parameter value is "true".
  ZegoRoomConfig roomConfig = ZegoRoomConfig.defaultConfig()..isUserStatusNotify = true;


  if (kIsWeb) {
      // ! ** Warning: ZegoTokenUtils is only for use during testing. When your application goes live,
      // ! ** tokens must be generated by the server side. Please do not generate tokens on the client side!
    roomConfig.token = ZegoTokenUtils.generateToken(appID, serverSecret, widget.localUserID);
  }
  // log in to a room
  // Users must log in to the same room to call each other.
  return ZegoExpressEngine.instance.loginRoom(roomID, user, config: roomConfig).then((ZegoRoomLoginResult loginRoomResult) {
    debugPrint('loginRoom: errorCode:${loginRoomResult.errorCode}, extendedData:${loginRoomResult.extendedData}');
    if (loginRoomResult.errorCode == 0) {
      startPreview();
      startPublish();
    } else {
      ScaffoldMessenger.of(context)
          .showSnackBar(SnackBar(content: Text('loginRoom failed: ${loginRoomResult.errorCode}')));
    }
    return loginRoomResult;
  });
}

Future<ZegoRoomLogoutResult> logoutRoom() async {
  stopPreview();
  stopPublish();
  return ZegoExpressEngine.instance.logoutRoom(widget.roomID);
}To start publishing a local audio or video stream to remote users, call the startPublishingStream method.
To stop the stream publishing, call the stopPublishingStream method.
Future<void> startPublish() async{
  // After calling the `loginRoom` method, call this method to publish streams.
  // The StreamID must be unique in the room.
  String streamID = '${widget.roomID}_${widget.localUserID}_call';
  ZegoExpressEngine.instance.enableCamera(false);
  return ZegoExpressEngine.instance.startPublishingStream(streamID);
}

Future<void> stopPublish() async {
  return ZegoExpressEngine.instance.stopPublishingStream();
}To start playing a remote video stream, call startPlayingStream method.
And to stop the stream playing, call the stopPlayingStream method.
Future<void> startPlayStream(String streamID) async {
  // Start to play streams.
  ZegoExpressEngine.instance.startPlayingStream(streamID)
}

Future<void> stopPlayStream(String streamID) async {
  ZegoExpressEngine.instance.stopPlayingStream(streamID);
}When your app starts, you need to call the createEngine method to initialize the SDK.
void main() {
  createEngine();
  runApp(const MyApp());
}⚠️ Reminder:
The call to createEngine() needs to be delayed due to the limitations of Flutter-Web. Typically, it can be triggered by the user clicking the login button. For detailed instructions, refer to the demo attached to this doc.
Open the file your_project/app/src/main/AndroidManifest.xml, and add the following code:
 <!-- Permissions required by the SDK -->
 <uses-permission android:name="android.permission.ACCESS_WIFI_STATE" />
 <uses-permission android:name="android.permission.RECORD_AUDIO" />
 <uses-permission android:name="android.permission.INTERNET" />
 <uses-permission android:name="android.permission.ACCESS_NETWORK_STATE" />
 <uses-permission android:name="android.permission.CAMERA" />
 <uses-permission android:name="android.permission.BLUETOOTH" />
 <uses-permission android:name="android.permission.MODIFY_AUDIO_SETTINGS" />

 <!-- Permissions required by the Demo App -->
 <uses-permission android:name="android.permission.READ_PHONE_STATE" />
 <uses-permission android:name="android.permission.WRITE_EXTERNAL_STORAGE" />
 <uses-permission android:name="android.permission.WAKE_LOCK" />

 <uses-feature android:glEsVersion="0x00020000" android:required="true" />
 <uses-feature android:name="android.hardware.camera" />
<uses-feature android:name="android.hardware.camera.autofocus" />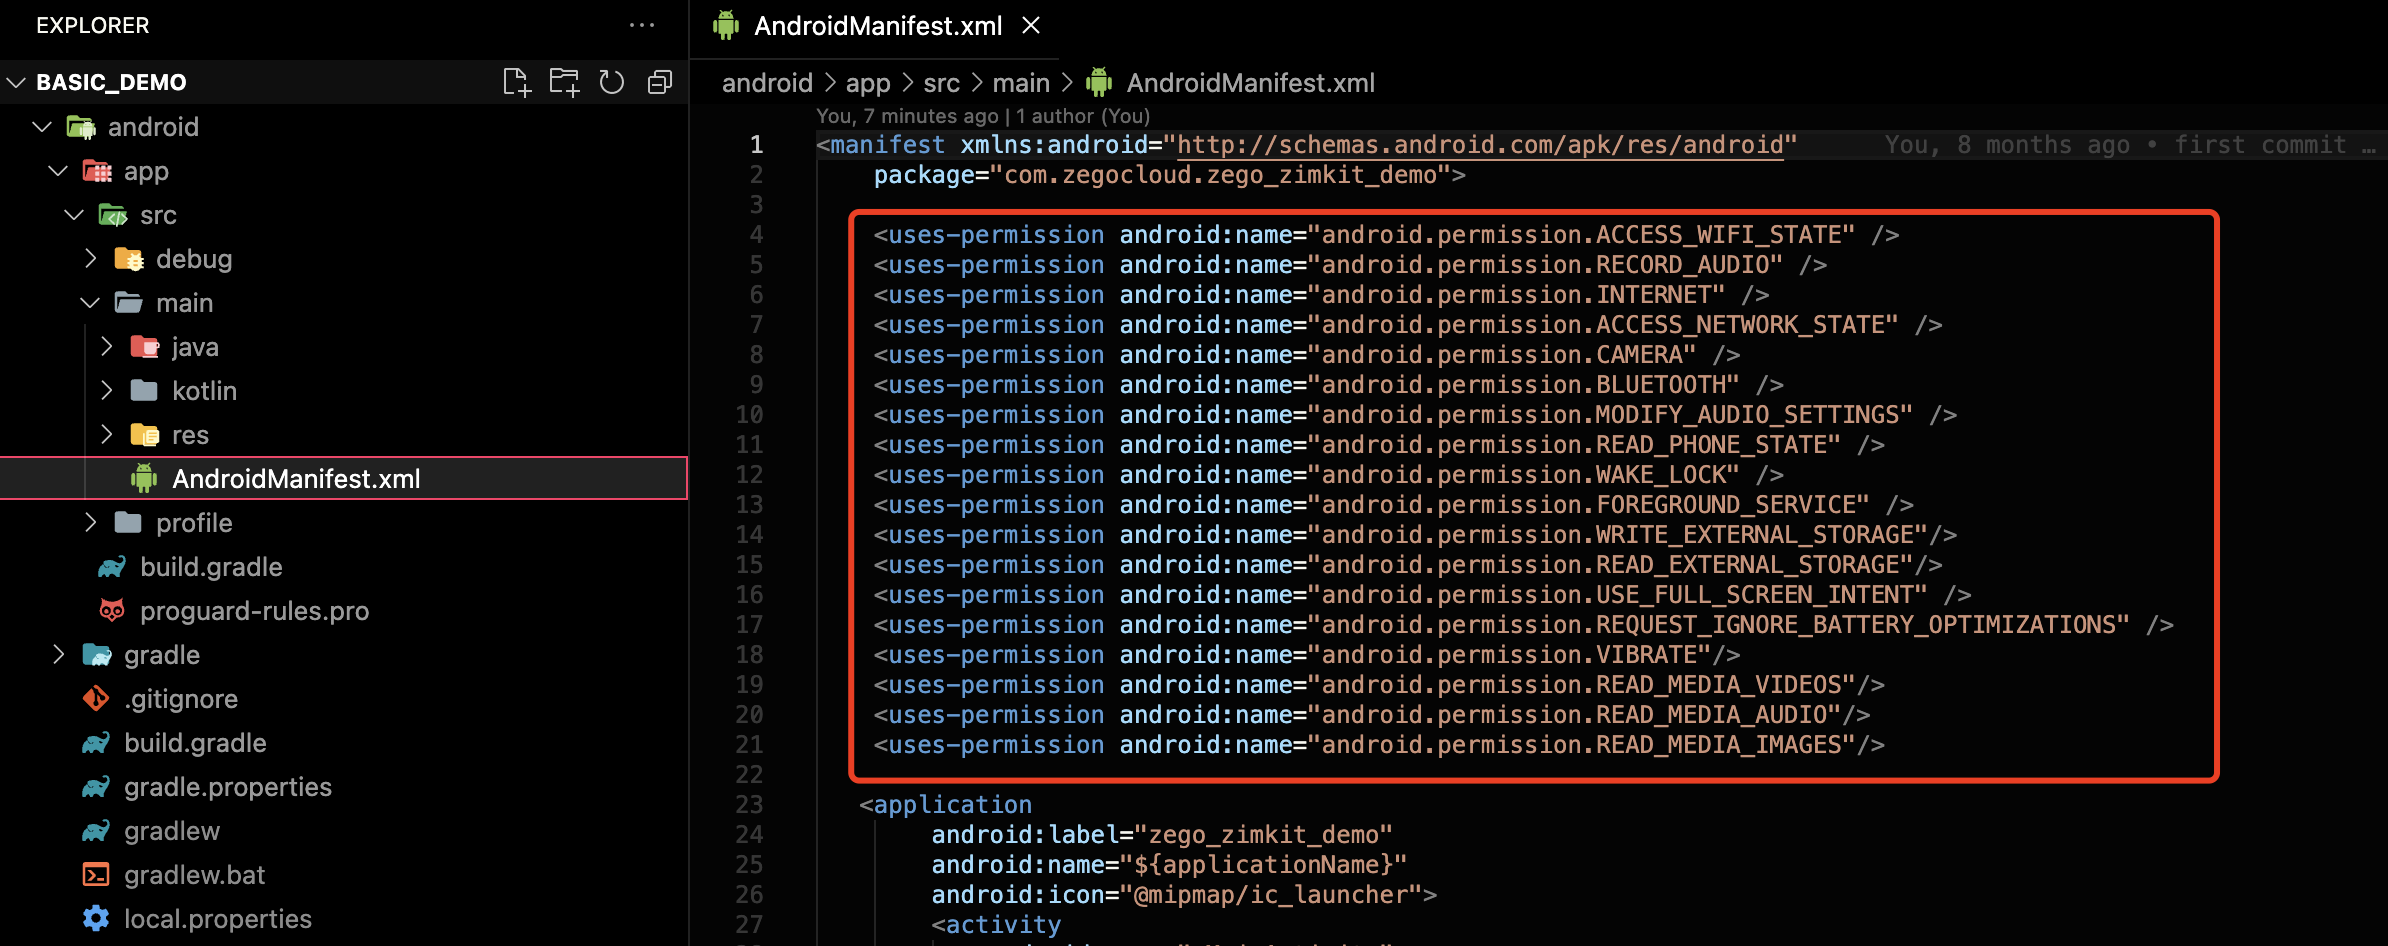)
Because Android 6.0 requires dynamic permissions to be applied for some more important permissions, you cannot apply for static permissions only through the "AndroidMainfest.xml" file. Please find a third-party flutter plug-in on pub to implement by yourself, or refer to the Android native layer and execute the following code, where "requestPermissions" is the method of "Activity".
String[] permissionNeeded = {
    "android.permission.CAMERA",
    "android.permission.RECORD_AUDIO"};

if (Build.VERSION.SDK_INT >= Build.VERSION_CODES.M) {
    if (ContextCompat.checkSelfPermission(this, "android.permission.CAMERA") != PackageManager.PERMISSION_GRANTED ||
        ContextCompat.checkSelfPermission(this, "android.permission.RECORD_AUDIO") != PackageManager.PERMISSION_GRANTED) {
        requestPermissions(permissionNeeded, 101);
    }
}
The optional permission android.permission.READ_PHONE_STATE is only used to implement the processing of SDK interrupt events, so it only needs to be declared in the AndroidMainfest.xml file, and does not need to be dynamically applied for (you will need to process it separately if you got more needs).
To prevent obfuscation of the SDK public class names, do the following:
a. In your project's your_project > android > app folder, create a proguard-rules.pro file with the following content as shown below:
-keep class **.zego.** { *; }b. Add the following config code to the release part of the your_project/android/app/build.gradle file.
proguardFiles getDefaultProguardFile('proguard-android.txt'), 'proguard-rules.pro'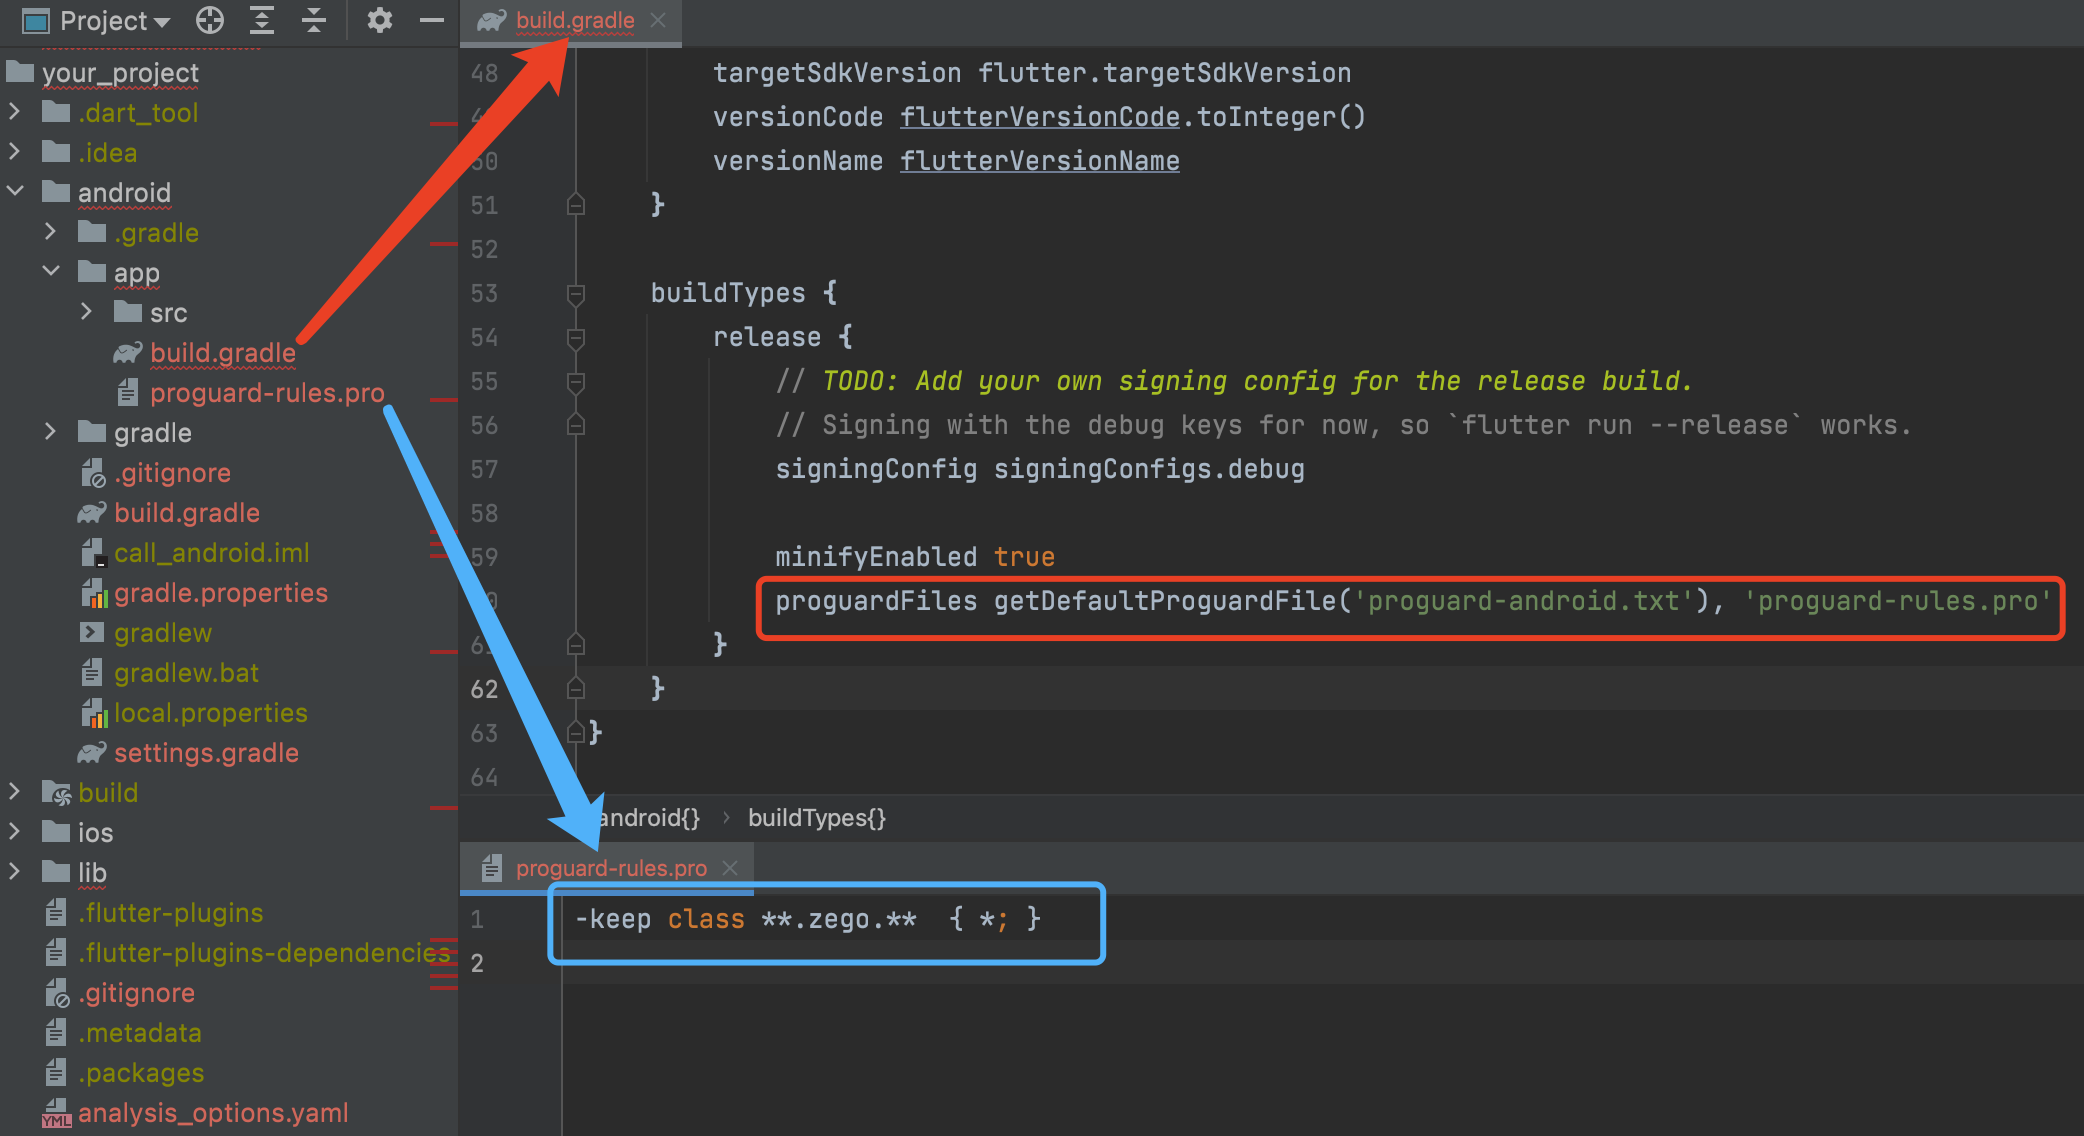)
To add permissions, open your_project/ios/Runner/Info.plist, and add the following code to the dict part:
<key>NSCameraUsageDescription</key>
<string>We require camera access to connect to a call</string>
<key>NSMicrophoneUsageDescription</key>
<string>We require microphone access to connect to a call</string>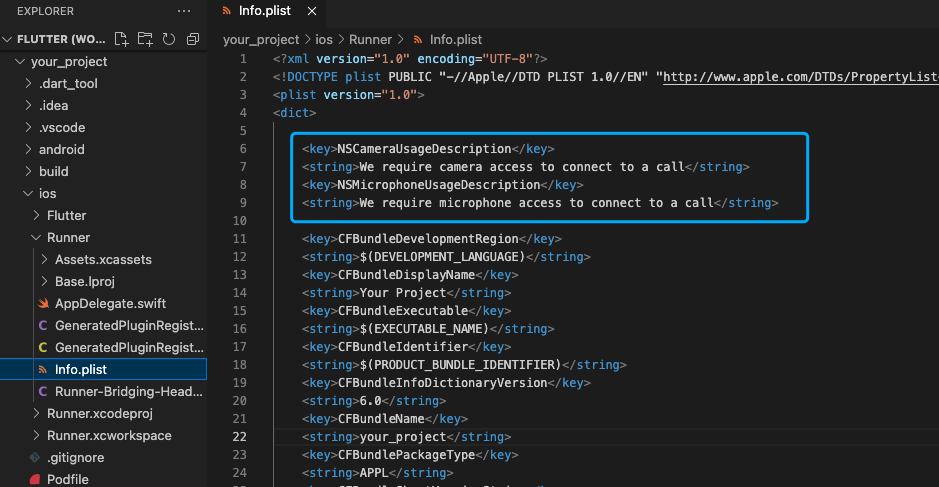)
For general considerations regarding Flutter Web projects, refer to the Flutter Web FAQ.
To configure your other platform apps, ZegoExpressEngine SDK doesn't require more special configs, while you will need to follow the docs below to set up your Flutter project's basic configs:
To test your implementation, run your app project on a real device.
For your convenience of testing experience, we got you a Web platform for debugging. On the debugging page, you can enter the AppID and room ID of the real device user, and a different user ID to log in to the same room for communicating with the real device user. After a voice call starts successfully, you can hear the remote audio.
