提交工单
咨询集成、功能及报价等问题
This guide describes how to integrate the SDK and implement a basic one-on-one voice call using ZEGOCLOUD's Voice Call SDK.
Before you begin, make sure you complete the following:
Skip to this step if a project already exists.
After configuring the development environment, run the command react-native init YourProject.
package.json, and add the "zego-express-engine-reactnative": "^x.y.z" to the dependencies.x.y.z is the latest SDK version number, which can be obtained by running an npm command.
In the root directory of your project, run the npm install zego-express-engine-reactnative --save command or the yarn add zego-express-engine-reactnative command to install the SDK.
Go to the iOS root directory, run the pod install command to install the dependencies.
Once you've done the operations above, you will be available to use the zego-express-engine-reactnative SDK in your project either in JavaScript or TypeScript (TypeScript is recommended).
Permissions can be set as needed.
Open the app/src/main/AndroidManifest.xml file, and add the following code:
<!-- Permissions required by the SDK -->
<uses-permission android:name="android.permission.ACCESS_WIFI_STATE" />
<uses-permission android:name="android.permission.RECORD_AUDIO" />
<uses-permission android:name="android.permission.INTERNET" />
<uses-permission android:name="android.permission.ACCESS_NETWORK_STATE" />
<uses-permission android:name="android.permission.CAMERA" />
<uses-permission android:name="android.permission.BLUETOOTH" />
<uses-permission android:name="android.permission.MODIFY_AUDIO_SETTINGS" />
<uses-permission android:name="android.permission.WRITE_EXTERNAL_STORAGE" />
<!-- Permissions required by the App -->
<uses-permission android:name="android.permission.READ_PHONE_STATE" />
<uses-permission android:name="android.permission.WAKE_LOCK" />

<uses-feature
    android:glEsVersion="0x00020000"
    android:required="true" />

<uses-feature android:name="android.hardware.camera" />
<uses-feature android:name="android.hardware.camera.autofocus" />
Because Android 6.0 requires dynamic permissions for some important permissions, you will need to apply for dynamic permissions by referring to the following code after applying for static permissions through the AndroidMainfest.xml file.
import {PermissionsAndroid} from 'react-native';

const granted = PermissionsAndroid.check(PermissionsAndroid.PERMISSIONS.CAMERA,
                                        PermissionsAndroid.RECORD_AUDIO);
granted.then((data)=>{
    if(!data) {
        const permissions = [PermissionsAndroid.PERMISSIONS.RECORD_AUDIO, PermissionsAndroid.PERMISSIONS.CAMERA];
        PermissionsAndroid.requestMultiple(permissions);
    }
}).catch((err)=>{
    console.log(err.toString());
})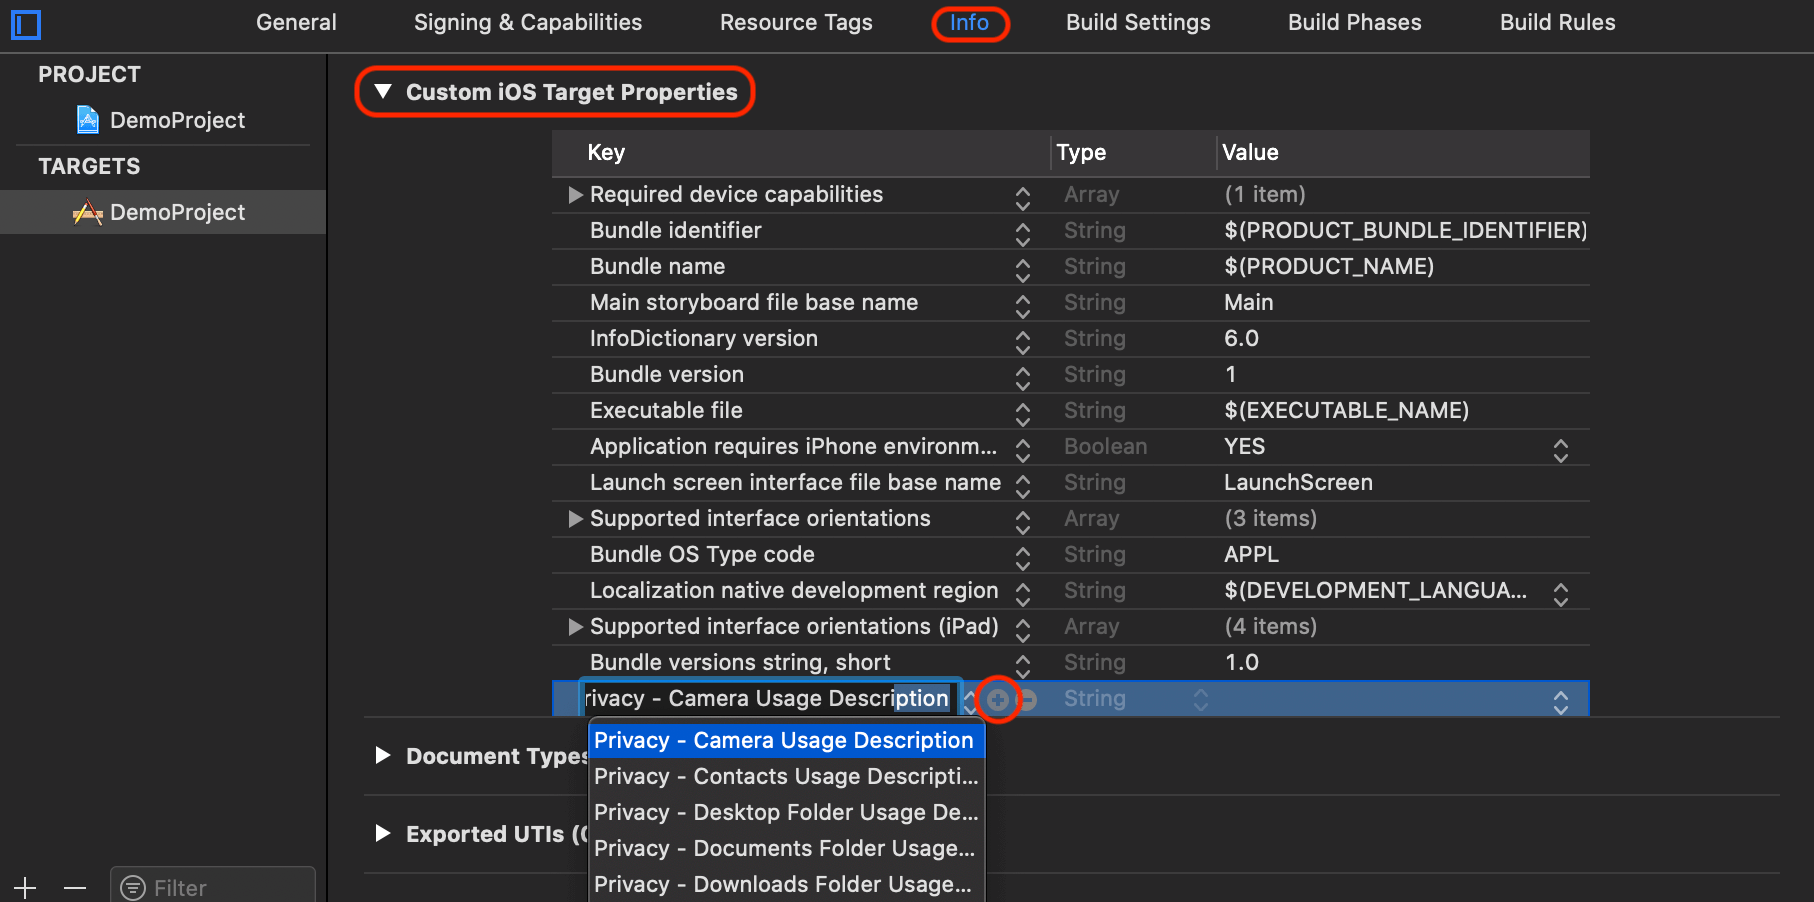)
Add the + button to add microphone and camera permissions.
Privacy - Camera Usage DescriptionPrivacy - Microphone Usage DescriptionAfter the permission is added, it will be shown as below:
)
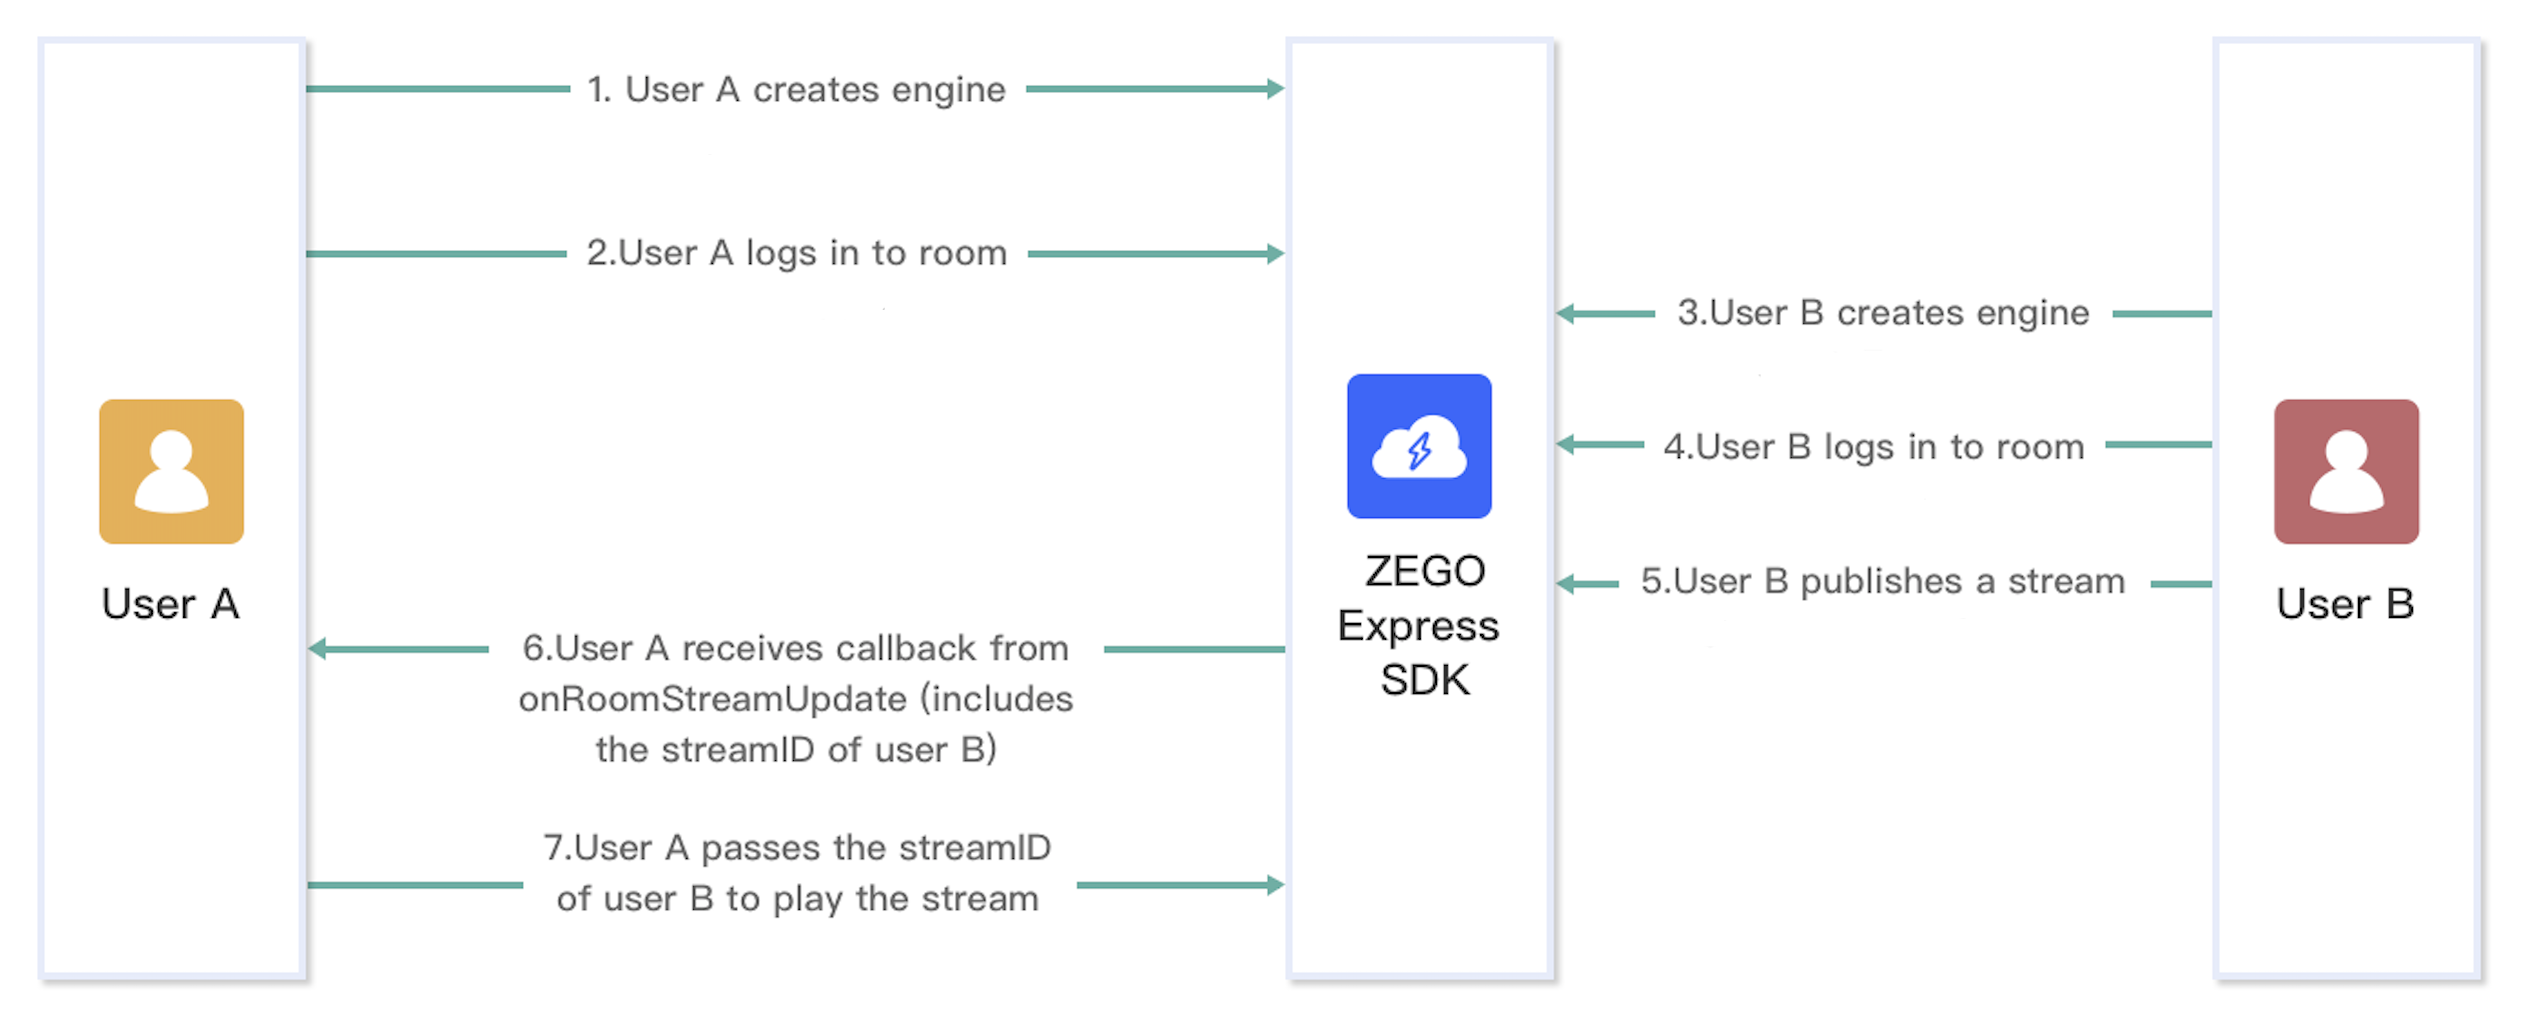
The following diagram shows the basic process of User A playing a stream published by User B:
)
For a better understanding, you can check the key concepts of Voice Call SDK:
The following sections explain each step of this process in more detail.
Here is the sample code for implementing voice call functions. Feel free to refer to it when developing.
ZegoExpressEngine instanceOptional: Create the UI
Before creating a ZegoExpressEngine instance, we recommend you add the following UI elements to implement the basic real-time audio feature:
)
To create a singleton instance of the ZegoExpressEngine class, call the createEngineWithProfile method with the AppID of your project.
To receive callbacks, call the on method after you created a ZegoExpressEngine instance. You can listen for and handle the callbacks as needed. For more information about event callbacks, see ZegoEventListener.
// Import the ZegoExpressEngine
import ZegoExpressEngine from 'zego-express-engine-reactnative';

const profile = {
appID : xxx,
scenario : 0
};

ZegoExpressEngine.createEngineWithProfile(profile)1. Log in
Before logging in to a room, you will need to generate a token first; Otherwise, the login will fail.
To generate a token, refer to the Use Tokens for authentication.
To log in to a room, call the loginRoom method. If the roomID does not exist, a new room will be created and you will log in automatically when you call the loginRoom method.
// set the token
let roomConfig = {};
roomConfig.token = "xxxx";
// log in to a room
ZegoExpressEngine.instance().loginRoom('room1', {'userID': 'id1', 'userName': 'user1'}, roomConfig);
2. Listen for and handle the event callbacks related to room users and streams
To listen for and handle various events that may happen after logging in to a room, you can implement the corresponding event callback methods of the event handler as needed. The following are some common event callbacks related to room users and streams:
roomStateUpdate: Callback for updates on current user's room connection status. When the current user's room connection status changes (for example, when the current user is disconnected from the room or login authentication fails), the SDK sends out the event notification through this callback.
roomUserUpdate: Callback for updates on the status of other users in the room. When other users join or leave the room, the SDK sends out the event notification through this callback.
roomStreamUpdate: Callback for updates on the status of the streams in the room. When new streams are published to the room or existing streams in the room stop, the SDK sends out the event notification through this callback.roomUserUpdate callback, you must set the isUserStatusNotify property of the room configuration parameter ZegoRoomConfig to true when you call the loginRoom method to log in to a room.roomStreamUpdate callback, and when there is a stream added, call the startPlayingStream method to start receiving and playing the newly added stream.
// Common event callbacks related to room users and streams.

ZegoExpressEngine.instance().on('roomStateUpdate', (roomID, state, errorCode, extendedData) => {
  // Callback for updates on the current user's room connection status.
  // When the current user's room connection status changes (for example, when the current user is disconnected from the room or login authentication fails), the SDK sends out the event notification through this callback.
}); ;


ZegoExpressEngine.instance().on('roomUserUpdate', (roomID, updateType, userList) => {
  // Callback for updates on the status of other users in the room.
  // When other users join or leave the room, the SDK sends out the event notification through this callback.
});

ZegoExpressEngine.instance().on('roomStreamUpdate', (roomID, updateType, streamList) => {
  // Callback for updates on the status of the streams in the room.
  // When new streams are published to the room or existing streams in the room stop, the SDK sends out the event notification through this callback.
});
1. Start publishing a stream
To start publishing a local audio or video stream to remote users, call the startPublishingStream method with the corresponding Stream ID passed to the streamID parameter.
streamID must be globally unique within the scope of the AppID. If different streams are published with the same streamID, the ones that are published after the first one will fail.
/** start publishing a stream */
ZegoExpressEngine.instance().startPublishingStream("streamID");
2. Start the local video preview
To start the local video preview, call the startPreview method with the view for rendering the local video passed to the canvas parameter.
import { findNodeHandle } from 'react-native';

// Obtain a Ref attribute from React (the Ref attribute reference a view of the local preview) to enable the local video preview.
let localViewRef = findNodeHandle(this.refs.zego_preview_view);

// Enable the local preview
ZegoExpressEngine.instance().startPreview({
    'reactTag': localViewRef,
    'viewMode': 0,
    'backgroundColor': 0
});

// React render
render() {
    return (
        <View>
            <ZegoTextureView ref='zego_preview_view'/>
        </view>
    )
}
3. Listen for and handle the event callbacks related to stream publishing
To listen for and handle various events that may happen after stream publishing starts, you can implement the corresponding event callback methods of the event handler as needed. The following is a common event callback related to stream publishing:
publisherStateUpdate: Callback for updates on stream publishing status. After stream publishing starts, if the status changes, (for example, when the stream publishing is interrupted due to network issues and the SDK retries to start publishing the stream again), the SDK sends out the event notification through this callback. ZegoExpressEngine.instance().on("PublisherStateUpdate", (streamID, state, errorCode, extendedData) => {
// After stream publishing starts, if the status changes, (for example, when the stream publishing is interrupted due to network issues and the SDK retries to start publishing the stream again), the SDK sends out the event notification through this callback.
//....
});1. Start playing a stream
To start playing a remote audio or video stream, call the startPlayingStream method with the corresponding Stream ID passed to the streamID parameter and the view for rendering the video passed to the view parameter.
You can obtain the stream IDs of the streams published by other users in the room from the callback roomStreamUpdate.
import { findNodeHandle } from 'react-native';

// Obtain a Ref attribute from React (the Ref attribute reference a view of the local preview) to enable the local video preview.
let remoteViewRef = findNodeHandle(this.refs.zego_play_view);

// Start playing a stream
ZegoExpressEngine.instance().startPlayingStream("streamID", {
    'reactTag': remoteViewRef,
    'viewMode': 0,
    'backgroundColor': 0
});

// React render
render() {
    return (
        <View>
            <ZegoTextureView ref='zego_play_view'/>
        </view>
    )
}
2. Listen for and handle the event callbacks related to stream playing
To listen for and handle various events that may happen after stream playing starts, you can implement the corresponding event callback methods of the event handler as needed. The following is a common event callback related to stream playing:
playerStateUpdate: Callback for updates on stream playing status. After stream playing starts, if the status changes (for example, when the stream playing is interrupted due to network issues and the SDK retries to start playing the stream again), the SDK sends out the event notification through this callback.ZegoExpressEngine.instance().on("PlayerStateUpdate", (streamID, state, errorCode, extendedData) => {
/** After stream playing starts, if the status changes (for example, when the stream playing is interrupted due to network issues and the SDK retries to start playing the stream again), the SDK sends out the event notification through this callback. */
//....
});1. Stop publishing a stream
To stop publishing a local audio or video stream to remote users, call the stopPublishingStream method.
/** Stop publishing a stream */
ZegoExpressEngine.instance().stopPublishingStream();
2. Stop the local video preview
If a local video preview is started, call the stopPreview method to stop it as needed.
// Stop local video preview
ZegoExpressEngine.instance().stopPreview();
3. Stop playing a stream
To stop playing a remote audio or video stream, call the stopPlayingStream method with the corresponding stream ID passed to the streamID parameter.
// Stop playing a stream
ZegoExpressEngine.instance().stopPlayingStream("streamID");
To log out of a room, call the logoutRoom method with the corresponding room ID passed to the roomID parameter. Upon successful logout, the SDK sends out a notification of the change of room connection status through the callback roomStateUpdate, and all the stream publishing, stream playing, and local video preview will be stopped.
// Log out of a room
ZegoExpressEngine.instance().logoutRoom('room1');ZegoExpressEngine instanceTo destroy the ZegoExpressEngine instance and release the resources it occupies, call the destroyEngine method.
ZegoExpressEngine.destroyEngine();If you want to wait and make sure the hardware resources are released, use the await keyword in the above method.
To test your implementation, run your app project on a real device.
For your convenience of testing experience, we got you a Web platform for debugging. On the debugging page, you can enter the AppID and room ID of the real device user, and a different user ID to log in to the same room for communicating with the real device user. After a call starts successfully, you can hear the remote audi.
