提交工单
咨询集成、功能及报价等问题
This document describes how to make your first voice/video call with the ZEGO CallUIKit. You can simply make a UI-embedded call or build a call app after integrating the CallUIKit.
To know what exactly the UI looks like, you can check our Sample app. If the UI provided in the sample app can't meet your requirements, we recommend you try our Call SDK, and implement the UI login on your own as needed.
ZEGO Call uses the Firebase Cloud Functions as the business server by default, we recommend you activate and deploy it before integrating the Call SDK.
To use your own business server instead of using the Firebase, refer to the Use ZEGO Call with your business server.
Create a Firebase project in the Firebase console. For details, see Firebase Documentation.
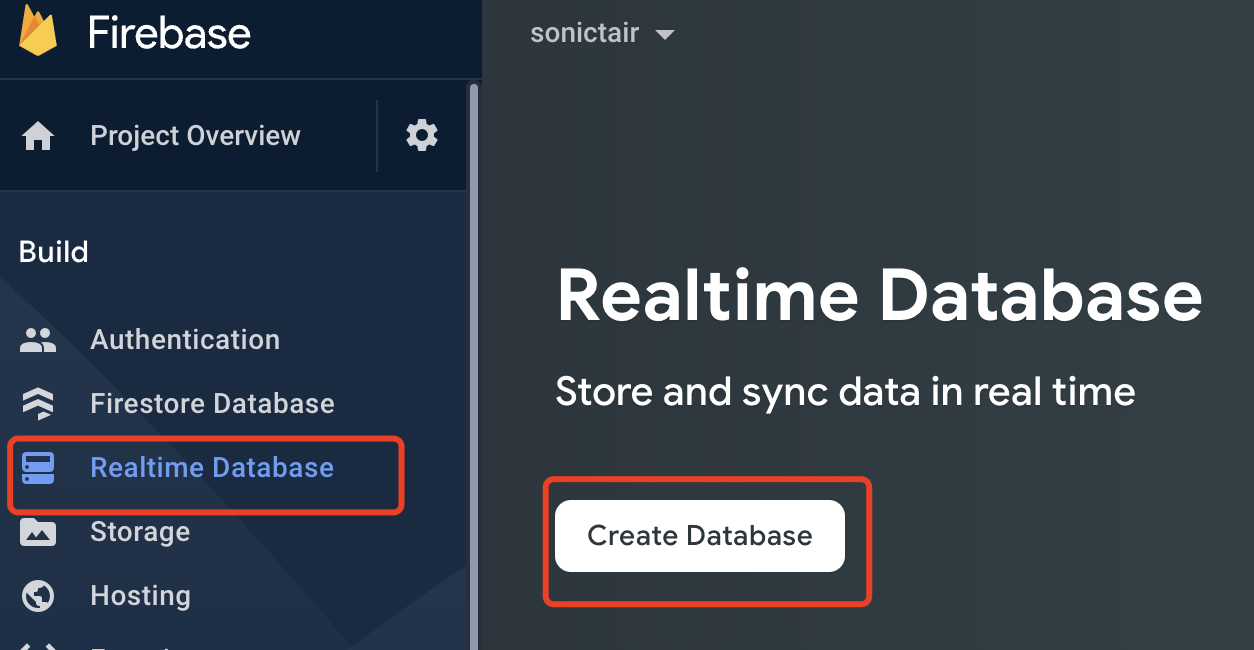
Create a new Realtime Database in Firebase.
)
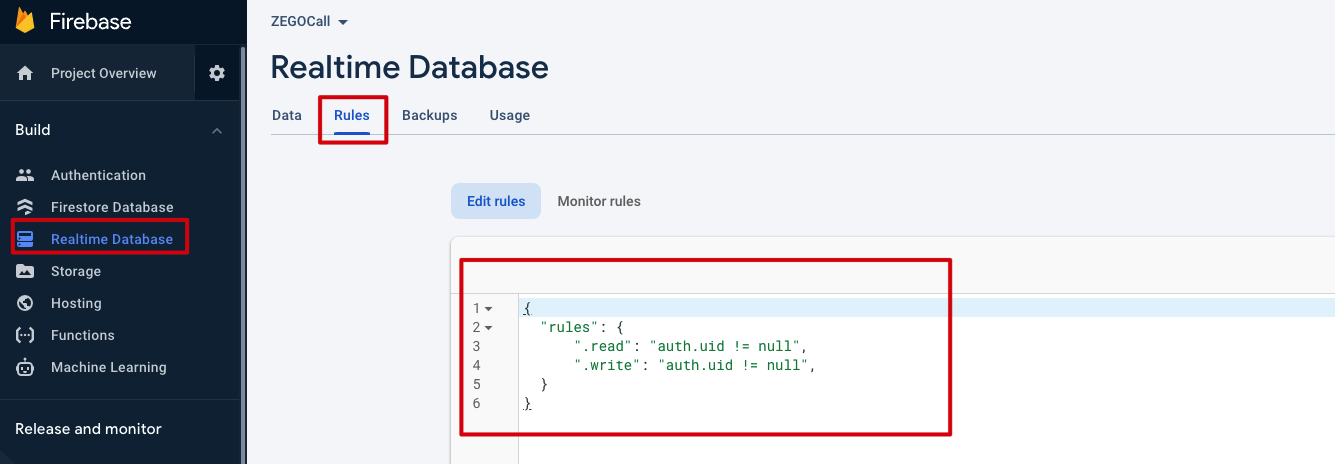
Edit the rules of the Realtime Database by adding the following:
{
  "rules": {
        ".read": "auth.uid != null",
        ".write": "auth.uid != null",
  }
})
Install the CLI via npm.
npm install -g firebase-toolsRun the firebase login to log in via the browser and authenticate the firebase tool.
Go to your Firebase project directory.
Run firebase init functions. The tool gives you an option to install dependencies with npm. It is safe to decline if you want to manage dependencies in another way, though if you do decline you'll need to run npm install before emulating or deploying your functions.
Download the Cloud function sample code.
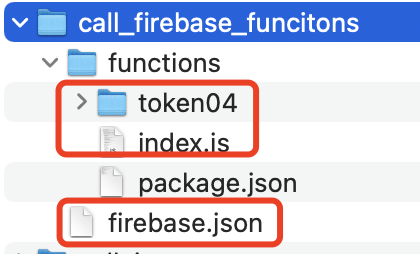
Copy the firebase.json and functions\index.js files in the sample code to your cloud function project, overwrite files with the same name.
Copy the functions\token04 folder from the cloud function project directory, and put it in the same folder together with the index.js.
)
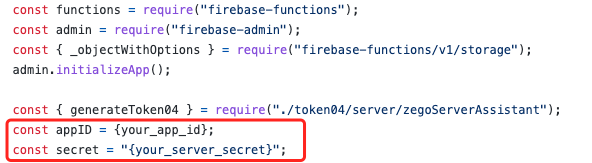
Modify the index.js file, fill in the AppID and ServerSecret you get from ZEGOCLOUD Admin Console correctly.
)
In Firebase CLI, run the firebase deploy --only functions command to deploy the cloud functions.
To integrate the ZEGOCallUIKit, do the following:
zegocall and zegocalluikit modules to your project root directory (Create a new project if you don't have an existing project).)
Modify the build.gradle file of your application (in the app folder), add the following code:
...
apply plugin: 'com.google.gms.google-services'
apply plugin: 'com.google.firebase.crashlytics'

android {
    ...
}

dependencies {
    ...

    // Google login SDK (only required for Google login)
    implementation 'com.google.android.gms:play-services-auth:20.1.0'
    implementation project(path: ':zegocalluikit')
}
)
)
Modify the build.gradle file of your project, add the following code:
If your Android Studio version is higher than "bumblebee 2021.1.1 patch 1", please modify the maven configuration in the setting.gradle. For more details, see How to add the Maven repositories in Android Studio version bumblebee?
buildscript {
    repositories {
        maven { url 'https://www.jitpack.io' }
        ...
    }
    dependencies {
        ...
        classpath 'com.google.gms:google-services:4.3.10'
        classpath 'com.google.firebase:firebase-crashlytics-gradle:2.8.1'
    }
}
)
Add Firebase to your project by referring to the Add Firebase to your Android project: Step 2-3, and make sure you have downloaded and added the google-services.json file to your app directory.
To prevent the ZEGO SDK public class names from being obfuscated, you can add the following code in the file proguard-rules.pro.
-keep class **.zego.**{*;}To initialize the ZEGOCallUIKit, get the ZegoCallManager instance, and pass the AppID of your project.
long appID =  ;// get from ZEGOCLOUD Admin Console ;
Application application = getApplication();  // android Application context ;
ZegoTokenProvider provider = new ZegoTokenProvider() {
    @Override
    public void getToken(String userID, ZegoTokenCallback callback) {
        //imply with your own method to supply zego RTC token,we will imply in the next step;
        getTokenFromCloudFunction(userID, 24 * 60 * 60, callback);
    }
};

/**
     * Initialize the ZEGOCallUIKit. We recommend you call this method when the application starts.
     * @param appID is the AppID you get from ZEGOCLOUD Admin Console.
     * @param application refers to the Application context object of the android project. Usually, you can get it by 'getApplication()'
     * @param provider refers to a function to provide a zegoRTC token, which will be implied in the next step.
     */
ZegoCallManager.getInstance().init(appID, application, provider);After deploying the Firebase Cloud Functions, here we get a Token by calling the client API methods of Firebase Cloud Functions:
private void getTokenFromCloudFunction(String userID, long effectiveTime, ZegoTokenCallback callback) {
    Map<String, Object> data = new HashMap<>();
    data.put("id", userID);
    data.put("effective_time", effectiveTime);

    FirebaseFunctions.getInstance().getHttpsCallable("getToken")
        .call(data)
        .continueWith(new Continuation<HttpsCallableResult, Object>() {
            @Override
            public Object then(@NonNull Task<HttpsCallableResult> task) throws Exception {
                return task.getResult().getData();
            }
        })
        .addOnCompleteListener(new OnCompleteListener<Object>() {
            @Override
            public void onComplete(@NonNull Task<Object> task) {
                if (!task.isSuccessful()) {
                    Exception e = task.getException();
                    if (e instanceof FirebaseFunctionsException) {
                        FirebaseFunctionsException ffe = (FirebaseFunctionsException) e;
                        FirebaseFunctionsException.Code code = ffe.getCode();
                        Object details = ffe.getDetails();
                    }
                    Log.d(TAG, "onComplete() called with: details = [" + e.getMessage() + "]");
                    return;
                }
                HashMap<String, String> result = (HashMap<String, String>) task.getResult();
                String token = result.get("token");
                Log.d(TAG, "onComplete() called with: token = [" + token + "]");
                callback.onTokenCallback(0, token);
            }
        });
}ZEGO Call does not provide user management capabilities yet. You will need to have users log in to Firebase and then call the setLocalUser method to set user information to CallUIKit based on the login result.
Firebase provides multiple login authentication modes. The following uses Google login as an example. For more modes, refer to the Firebase official.
First, open your layout file and add the following:
<?xml version="1.0" encoding="utf-8"?>
<androidx.constraintlayout.widget.ConstraintLayout xmlns:android="http://schemas.android.com/apk/res/android"
  xmlns:app="http://schemas.android.com/apk/res-auto"
  xmlns:tools="http://schemas.android.com/tools"
  android:layout_width="match_parent"
  android:layout_height="match_parent">

  <com.google.android.gms.common.SignInButton
    android:id="@+id/sign_in_button"
    android:layout_width="wrap_content"
    android:layout_height="wrap_content"
    app:layout_constraintBottom_toBottomOf="parent"
    app:layout_constraintLeft_toLeftOf="parent"
    app:layout_constraintRight_toRightOf="parent"
    app:layout_constraintTop_toTopOf="parent"
    app:layout_constraintVertical_bias="0.3" />

</androidx.constraintlayout.widget.ConstraintLayout>
Next, in the Android activity, initialize the Google login.
import android.content.Intent;
import android.os.Bundle;
import android.util.Log;
import android.view.View;
import android.view.View.OnClickListener;
import androidx.annotation.NonNull;
import androidx.appcompat.app.AppCompatActivity;
import com.google.android.gms.auth.api.signin.GoogleSignIn;
import com.google.android.gms.auth.api.signin.GoogleSignInAccount;
import com.google.android.gms.auth.api.signin.GoogleSignInClient;
import com.google.android.gms.auth.api.signin.GoogleSignInOptions;
import com.google.android.gms.common.api.ApiException;
import com.google.android.gms.tasks.Continuation;
import com.google.android.gms.tasks.OnCompleteListener;
import com.google.android.gms.tasks.Task;
import com.google.firebase.auth.AuthCredential;
import com.google.firebase.auth.AuthResult;
import com.google.firebase.auth.FirebaseAuth;
import com.google.firebase.auth.FirebaseUser;
import com.google.firebase.auth.GoogleAuthProvider;
import com.google.firebase.functions.FirebaseFunctions;
import com.google.firebase.functions.FirebaseFunctionsException;
import com.google.firebase.functions.HttpsCallableResult;
import im.zego.callsdk.callback.ZegoTokenCallback;
import im.zego.calluikit.ZegoCallManager;
import java.util.HashMap;
import java.util.Map;


public class MainActivity extends AppCompatActivity {

    private static final String TAG = "GoogleActivity";
    private static final int RC_SIGN_IN = 9001;

    private GoogleSignInClient mGoogleSignInClient;

    @Override
    protected void onCreate(Bundle savedInstanceState) {
        super.onCreate(savedInstanceState);
        setContentView(R.layout.activity_main);

        GoogleSignInOptions gso = new GoogleSignInOptions.Builder(GoogleSignInOptions.DEFAULT_SIGN_IN)
            .requestIdToken(getString(R.string.default_web_client_id))
            .requestEmail()
            .build();

        mGoogleSignInClient = GoogleSignIn.getClient(this, gso);
        findViewById(R.id.sign_in_button).setOnClickListener(new OnClickListener() {
            @Override
            public void onClick(View view) {
                Intent signInIntent = mGoogleSignInClient.getSignInIntent();
                startActivityForResult(signInIntent, RC_SIGN_IN);
            }
        });

        FirebaseUser currentUser = FirebaseAuth.getInstance().getCurrentUser();
        if (currentUser != null) {
            onUserSigned();
        }
    }

    // [START onactivityresult]
    @Override
    public void onActivityResult(int requestCode, int resultCode, Intent data) {
        super.onActivityResult(requestCode, resultCode, data);

        // Result returned from launching the Intent from GoogleSignInApi.getSignInIntent(...);
        if (requestCode == RC_SIGN_IN) {
            Task<GoogleSignInAccount> task = GoogleSignIn.getSignedInAccountFromIntent(data);
            try {
                // Google login was successful, authenticate with Firebase
                GoogleSignInAccount account = task.getResult(ApiException.class);
                AuthCredential credential = GoogleAuthProvider.getCredential(account.getIdToken(), null);
                FirebaseAuth.getInstance().signInWithCredential(credential)
                    .addOnCompleteListener(this, new OnCompleteListener<AuthResult>() {
                        @Override
                        public void onComplete(@NonNull Task<AuthResult> task) {
                            if (task.isSuccessful()) {
                                // Sign in success, update UI with the signed-in user's information
                                Log.d(TAG, "signInWithCredential:success");
                                onUserSigned();
                            } else {
                                // If sign in fails, display a message to the user.
                                Log.w(TAG, "signInWithCredential:failure", task.getException());
                            }
                        }
                    });
            } catch (ApiException e) {
                // Google login failed, update UI appropriately
                Log.w(TAG, "Google sign in failed", e);
            }
        }
    }
    // [END onactivityresult]

    private void onUserSigned() {
        FirebaseUser currentUser = FirebaseAuth.getInstance().getCurrentUser();
        ZegoCallManager.getInstance().setLocalUser(currentUser.getUid(), currentUser.getDisplayName());
    }
}To make an outbound voice call, call the callUser method and set the zegoCallType parameter to ZegoCallType.Voice.
For Android 6.0 or later, some important permissions must be requested both at runtime and declared statically in the file AndroidMainfest.xml, you can add the following code to do so (requestPermissions is a method of an Android Activity).
For more indormation, refer to Request app permissions.
// This shows how to request camera and audio permissions at run time, we use third-party library to do this.
PermissionX.init(this)
    .permissions(Manifest.permission.CAMERA, Manifest.permission.RECORD_AUDIO)
    .request((allGranted, grantedList, deniedList) -> {
    });
You can make a call after getting the access permission of the camera and microphone.
// The target userInfo refers to the user info (ID and name) of the user you want to call, it is set in the previous step by `setLocalUser`, you should get it by your user management.
// ZegoCallType.Voice indicates that you make a voice call.
ZegoCallManager.getInstance().callUser(userInfo, ZegoCallType.Voice);
To make an outbound video call, call the callUser method and set the zegoCallType parameter to ZegoCallType.Video.
// userInfo refers to the user info(ID and name) of the user you want call.
// ZegoCallType.Video indicates that you make a video call.
ZegoCallManager.getInstance().callUser(userInfo, ZegoCallType.Video);
After making a call, the CallUIKit shows the UI of the current state automatically for both the callee and caller (integrated the CallUIKit is required), and, you can operate on the UI for further operations.
The following displays when the caller calls the method to make a call (make a voice call for illustration)
)
To receive in-time notifications when receiving incoming calls, call the startListen method to listen for the call invitations. The corresponding UI displays and you can operate on the UI for further calling responses.
// Listen for the call invitations.
// Pass the current Activity.
ZegoCallManager.getInstance().startListen(this);
When the app is running in the frontend: the following black pop-up prompts automatically when the callee receives an incoming call (make a voice call for illustration)
)
When the app is running in the backend: the following black pop-up prompts after granting the offline notification permission when the callee receives an incoming call. For more, refer to the document canDrawOverlays. Different phone vendors may require different settings based on the operating system and version, for example, OPPO, Vivo.
To stop listening for the incoming calls, call the stopListen method. You won't receive notifications after calling this method.
// Stop listening for the incoming calls.
// Pass the same Activity that you used to start listening for the incoming calls.
ZegoCallManager.getInstance().stopListen(this);The Firebase Cloud Functions has implemented the offline notifications of the firebase cloud message, and it sends a data type fcm message when making outbound calls. For clients to receive offline notifications, integrate the firebase cloud message, and start the app when receiving the offline notifications:
@Override
public void onMessageReceived(RemoteMessage remoteMessage) {

    Map<String, String> data = remoteMessage.getData();

    boolean isAppNotStart = !AppUtils.isAppForeground() && ActivityUtils.getActivityList().isEmpty();
    boolean isDeviceRestart = AppUtils.isAppForeground() && ActivityUtils.getActivityList().isEmpty();
    if (isAppNotStart || isDeviceRestart) {
        if (data.size() > 0) {
            AppUtils.relaunchApp();
        }
    }
}When you encounter problems when using your app, call the uploadLog method to upload logs for us to locate and help you faster.
ZegoCallManager.getInstance().uploadLog(errorCode -> {
    // Callback for the result of upload SDK logs.
});After finishing using the ZEGO Call, call the unInit method to deinitialize the SDK.
ZegoCallManager.getInstance().unInit();
