提交工单
咨询集成、功能及报价等问题
This document describes how to use the ZIM SDK (In-app Chat) to send and receive messages.
Before you begin, make sure:
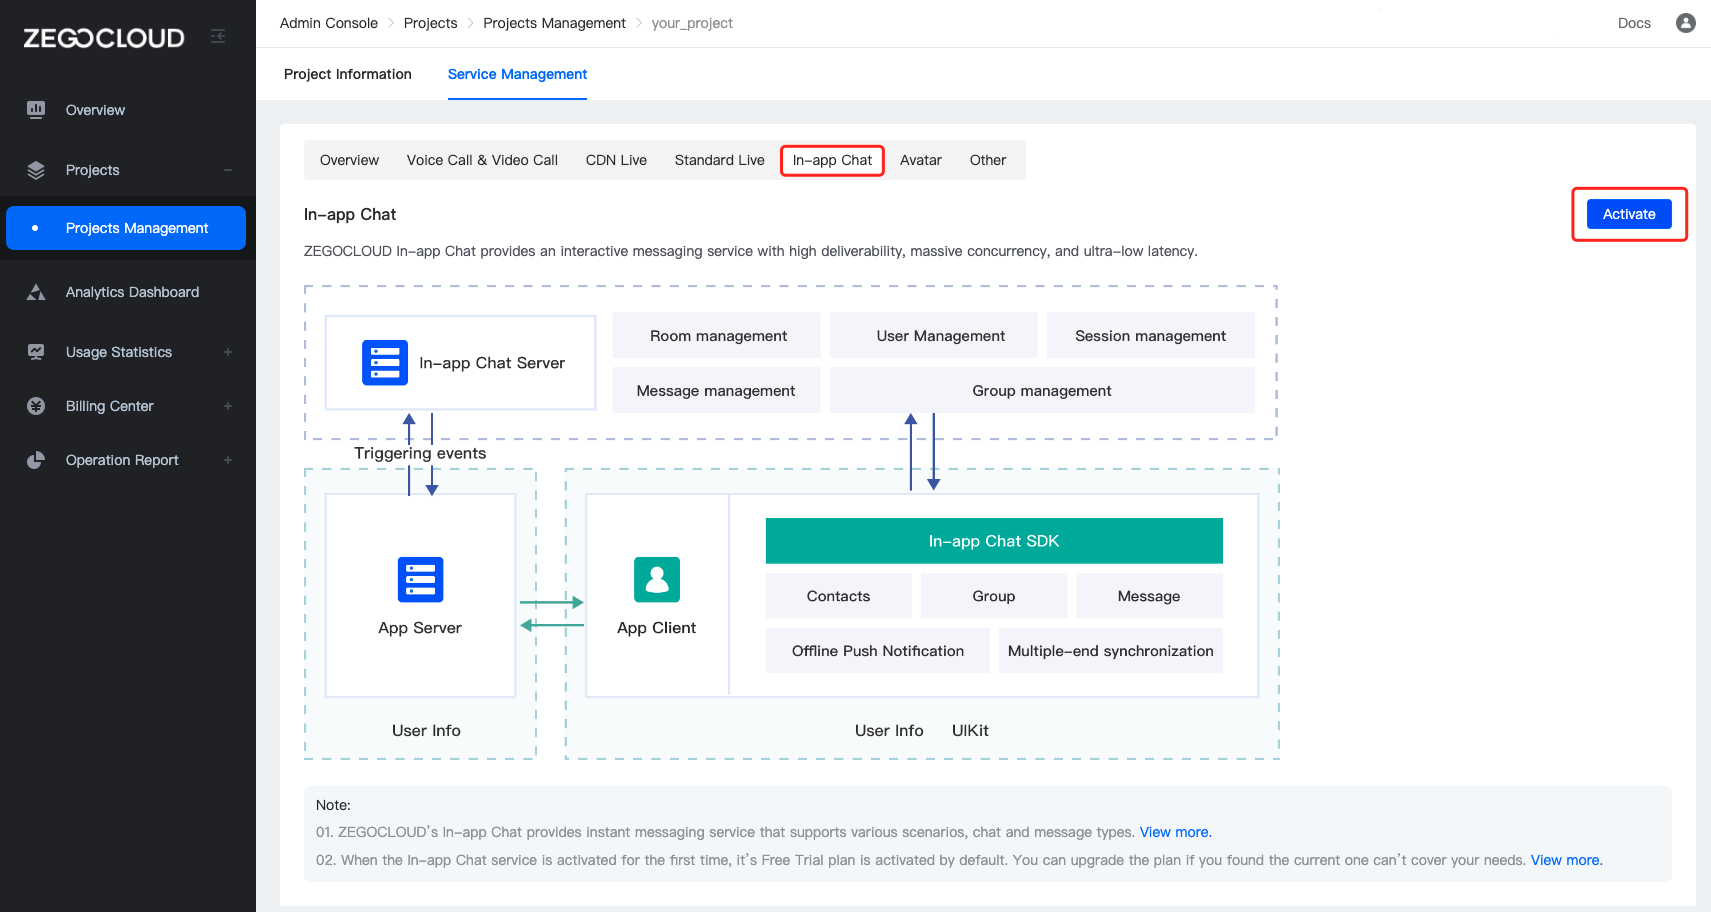)
Skip to this step if a project already exists.
Zego-zim-example.This command line utility doesn't need to be installed and can be used directly with the Node.js npx command:
```
npx react-native init zego-zim-example
```
Compile and run the project on iOS:
yarn react-native run-iosCompile and run the project on Android:
yarn react-native run-androidThe following shows how to integrate the SDK using NPM:
Execute the npm i zego-zim-react-native or yarn add zego-zim-react-nativecommand to install the dependencies.
We recommend you use the NPM package that supports the TypeScript language.
Import the SDK.
import ZIM from 'zego-zim-react-native';Get the sample code from Sample app.
Refer to the Integrate the SDK using NPM to import the SDK package file.
Creating a ZIM instance is the very first step, an instance corresponds to a user logging into the system as a client.
So, let's suppose we have two clients now, client A and client B.
To send and receive messages to each other, both of them will need to call the create method with the AppID in the previous Prerequisites steps to create a ZIM SDK instance of their own:
// Since In-app Chat 2.3.0, the SDK uses the AppSign authentication mode by default. To change the authentication mode:
// 1. For SDK 2.3.3 or later, you can change the authentication mode by yourself.  2. For SDK 2.3.0 or later, if you want to change your authentication mode back to using the Token, contact Technical Support.

// Use a static synchronized method to create a ZIM SDK object and pass the AppID and AppSign.
// The create method creates a ZIM instance only the first time it is called. Any subsequent use will return null.
ZIM.create({ appID: 0, appSign: '' });
// Please get a single instance via the getInstance method to avoid hot updates that return null multiple times using the create method.
var zim = ZIM.getInstance();Before a client user's login, you will need to call the on method to customize the event callbacks, such as you can receive callback notifications when SDK errors occur or receive message-related callback notifications.
// Set up and listen for the callback for receiving error codes.
zim.on('error', function (zim, errorInfo) {
    console.log('error', errorInfo.code, errorInfo.message);
});

// Set up and listen for the callback for connection status changes.
zim.on('connectionStateChanged', function (zim, { state, event, extendedData }) {
    console.log('connectionStateChanged', state, event, extendedData);
});

// Set up and listen for the callback for receiving one-to-one messages.
zim.on('receivePeerMessage', function (zim, { messageList, fromConversationID }) {
    console.log('receivePeerMessage', messageList, fromConversationID);
});For client A and client B to send, receive messages, and renew the token after creating the ZIM SDK instance, they will need to log in to the ZIM SDK.
To log in, Clients A and B both need to do the following:
ZIMUserInfo method to create a user object.login method with their own user information and the Token they get in the previous Prerequisites steps.You can custom the userID and userName, and we recommend you set the userID to a meaningful value and associate them with the account system of your application.
For SDK 2.3.0 or later: The SDK uses the AppSign authentication mode by default. You only need to pass the ZIMUserInfo when logging in.
If you use the Token-based authentication mode, please refer to the Authentication to get the Token first, and pass it when logging in.
// userID must be within 32 characters, and can only contain letters, numbers, and the following special characters: '~', '!', '@', '#', '$', '%', '^', '&', '*', '(', ')', '_', '+', '=', '-', '`', ';', '’', ',', '.', '<', '>', '/', '\'.
// userName must be 1-64 characters.
var userInfo = { userID: 'xxxx', userName: 'xxxx' };

// When logging in:
// If you use the Token-based authentication, pass the Token you get by referring to the [Guides - Authentication] document.
// If you use the AppSign authentication mode (the default auth mode by SDK 2.3.0), you need to leave the Token field empty.

zim.login(userInfo, '')
    .then(function () {
        // Login successful.
    })
    .catch(function (err) {
        // Login failed.
});Client A can send messages to client B after logging in successfully.
Currently, the ZIM SDK supports the following message types:
| Message type | Description | Details |
|---|---|---|
ZIMTextMessage(1) |
Text message. Size limit: 32 KB. Rate limit: 10 requests/second. |
Enable messages to be more deliverable, and can be stored as message history. Suitable for one-on-one chat and group chat. |
ZIMCommandMessage(2) |
Customizable signaling message. Size limit: 5 KB. Rate limit: 10 requests/second. |
Supports massive concurrency. Suitable for live audio room, online classroom, the messages won't be stored after the room is destroyed. |
ZIMBarrageMessage(20) |
In-room barrage message (bullet) screen message). Size limit: 5 KB. No specific rate limit. |
The high-frequency messages that don't require 100% deliverability, this message type is often used to send bullet screen messages. Supports massive concurrency, but the message deliverability can't be guaranteed. |
ZIMImageMessage(11) |
Image message. Supports major image formats, including JPG, PNG, BMP, TIFF, and GIF. Size limit: 10 MB. Rate limit: 10 requests/second. |
Enable messages to be more deliverable, and can be stored as history messages. Suitable for one-on-one chat, room chat, and group chat. |
ZIMFileMessage(12) |
File message. Supports files in any format. Size limit: 100 MB. Rate limit: 10 requests/second. |
|
ZIMAudioMessage(13) |
Voice message. Supports voice messages in MP3 format within 300 seconds. Size limit: 6 MB. Rate limit: 10 requests/second. |
|
ZIMVideoMessage(14) |
Video message. Supports video messages in MP4 or MOV format. Size limit: 100 MB. Rate limit: 10 requests/second. |
To send one-to-one messages, for example, if client A wants to send a message to client B, then client A needs to call the sendMessage method with client B's userID, message content, and message type (conversationType).
ZIMMessageSentResult: Callback for the results that whether the message is sent successfully.
onMessageAttached callback: The callback on the message not sent yet. Before the message is sent, you can get a temporary ZIMMessage message for you to implement your business logic as needed. For example, you can get the ID of the message before sending it. Or when sending a message with large content, such as a video, you can get the localMessageID of the message before the message is uploaded to implement a Loading UI effect.
// The following shows to send a one-to-one message, set the ZIMConversationType to Peer.
var toUserID = 'xxxx1';
var config = {
    priority: 1 // Set priority for the message. 1: Low (by default). 2: Medium. 3: High.
};
var type = 0; // Session type. Values are: 0: One-on-one chat.  1: Chat room  2: Group chat.
var notification = {
    onMessageAttached: function(message) {
        // todo: Loading
    }
};

// Send one-to-one text messages.
var messageTextObj = { type: 1, message: 'Text message content' };
zim.sendMessage(messageTextObj, toUserID, type, config, notification)
    .then(function ({ message }) {
        // Message sent successfully.
    })
    .catch(function (err) {
        // Failed to send the message.
});After client B logs in, he will receive client A's message through the callback on which is already set in the receivePeerMessage method.
// Set up and listen for the callback for receiving the one-to-one messages.
zim.on('receivePeerMessage', function (zim, { messageList, fromConversationID }) {
    console.log('receivePeerMessage', messageList, fromConversationID);
});For a client to log out, call the logout method.
zim.logout();To destroy the ZIM SDK instance, call the destroy method.
zim.destroy();